Monday, May 30, 2011

KITCHEN TOOLS - Spice Racks

Spices have been with us since we first crawled on the earth.

Spice rack
We've been using spices since as far back as 50,000 BC, according to archeological findings. 

The spice trade developed throughout the Middle East in around 2000 BC with cinnamon and pepper, and in East Asia (Korea, China) with herbs and pepper. The Egyptians used herbs for embalming and their need for exotic herbs helped stimulate world trade.

The word spice comes from the Old French word "espice" which became "epice" and which came from the Latin root "spec", the noun referring to appearance, sort, kind.

By 1000 BC, China, Korea and India had medical systems based upon herbs. Early uses were connected with magic, medicine, religion, tradition, and preservation.
With that kind of history, spices deserve a good home.
Enter the Spice Rack. These things have a history too, as one might imagine.

Experts think that the invention of the spice rack took place in 1000 B.C and was probably constructed of wood. Built for storage rather than for decorating the kitchen, they were utilitarian, plain.  
As time progressed and spices became more commonplace and spice racks moved from hidden corners in the back pantry to becoming a decorative focal point the kitchen.

My kitchen has spice racks, drawers, cabinets and shelves....I guess you could say we have a lot of spices in our house. My favorite is one Jack made for his mother when he was 19 years old-he's 61 now.  A family heirloom, it holds a place of honor in our kitchen.

Aside from being decorative treasures they're also very functional.  They keep the spices organized and shielded from dampness, light and heat.  

Jack's home made cabinet (closed)
That's a major consideration; protecting spices from dampness, light and heat.  Too often they are left defenseless against the elements...exposed to things that can and do destroy them.  And then you are left to wonder why the ground garlic is clumpy, the sage has lost its sage-ness and the basil has started to smell like a damp basement.  What a waste!  What a tragic loss of beautiful flavors!
Try to remember spices come from living things...and though they're no longer part of the plant they came from, they're still subject to the whims and whimseys of nature. 

Jack's home made cabinet opened
Keep this in mind when planning your kitchen.  Locate your racks away from direct sunlight, dampness and heat.  Also, consider more than one so you can organize your spices according to use.  Some are for baking, others for roasting, stewing and so on.

Also, remember that spices have a shelf life.  If they start smelling sour they probably are.  Or if the green oregano is starting to look grey, it's most likely past its prime. All it takes is a little TLC.

Your food....and your spices will thank you.

Wednesday, May 25, 2011

KITCHEN TOOLS - Bowls Part 2

The "shiny stainless" bowls
As if you weren't bowled over enough from our previous encounter with the things, here we are...back in the kitchen, bowling again.  And why not?  There's so much more to say on the subject.
 
Some folks are asking if I use anything other than stainless steel.
Yes, I do.  My bread making bowls are made of Pyrex, stoneware or other crockery-this for a very simple reason. When curing or raising, the dough bowl is set in a warm place for a couple of hours.  You'll  need a bowl that will "find" and maintain an even temperature throughout the process.

Crockery, stoneware or Pyrex will do that.  Stainless, not so much.  There are warm, cool and cold spots to be found in them, and this can adversely effect the rising.  Yeasties are living critters, and quite particular about their surroundings. They don't like to be chilly!

My yellow Pyrex mixing bowl is perfect for letting those critters rise in the warmth and comfort they deserve.
Memory Lane yellow Pyrex mixing bowl

I've had it for a number of years, a garage sale score.  I was drawn to it for strictly nostalgic reasons; Mom had one just like it back in the day.I remember it was part of a set she got with her Sunbeam table top mixer. I scarfed it up for $1.50  before anybody had a chance to think twice!

But once home, the bowl was instantly pressed into service.

Through the many changes life's brought, this bowl has,so far, remained intact and ready for action on the front lines of my cooking endeavors.  "Old Yeller" garnered the respect of every other vessel in the kitchen, including the stainless steel ones-who are not so easily impressed.

So although the "shiny stainless" are used for a great many culinary purposes, my yellow Pyrex will always hold a special place in my heart, and will remain on active duty in my kitchen.

Apple bowls
One of my other favorites is actually a set of apple bowls that I got as a gift from one of my dearest long-time friends.  Not only are they handy and practical, they're beautiful.

I use these apple bowls for mixing...and serving fruits, side dishes and snacks as well. They're great in any setting, formal or informal.
They sure brighten up a table!

So look around your kitchen....give those useful, often unsung heroes a nod of acknowledgement.
Bowls are an intrinsic part of the food preparation process. They've been with us since before recorded history. No matter what else happens with technology, they will always be part of our lives.

Feel free to share your thoughts and ideas!

Sunday, May 22, 2011

KITCHEN TOOLS Put A Lid On It!

Pan Lid - the true cover story
This is one of those tools we take for granted a thousand different times and a million different ways....the lowly pan lid.

At first glance, it doesn't seem like much.  It's made to fit a certain pan, has a handle, yadda, yadda, yadda.
So?   It's a lid.  What else is there to say?

Plenty! Once you take the time to notice the subtle and not-so subtle differences between them.

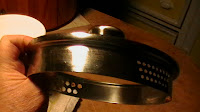
One lid type has this profile
Take for example the one that comes with most sauce pans....round, solid metal, handle....all standard issue.  But take a sideways glance at it.  Check out that profile!

Some have a flange-like rim.  This keeps the heat in, and also keeps the lid on. I think a majority of lids have this flange thing in varying degrees of depth - probably for the same purpose.
Another metal lid with smaller flange

What does a lid actually do?
Are there times when you don't want to cover your cooking?
These are important questions!
Knowing the right answer can literally make or break what you're trying to produce.

Everybody knows the heartache of broccoli that's been allowed to steam itself to death.  There's nothing worse than discolored, mushy, overcooked broc!

So what's the secret?  It seems to depend on what's cooking and how long its being cooked.

Specialty lid with vented edges
Steaming green vegetables that will be steamed for more than five minute? Don't use a lid.  Why? It has to do with something called "out gassing."  The green vegetables release volatile acids that need to dissipate into the air. Covering while cooking traps the acids in with the veggies, causing them to turn an unappetizing shade of grey.

Boiling water to cook pasta?  A lid is good to use at first.  This will help retain the heat and cause the water to boil quicker.  Once the water has reached that rolling boil state, remove the lid and add the pasta.  Cook it uncovered.  That's very important.  Otherwise the pasta will bubble over and you'll have quite a mess!

As a contrast, a lid is absolutely required when preparing things like rice, grits and other cereals.  Covering and lowering the heat go hand in hand when it comes to these cereals. And as far as pressure cooking is concerned, it wouldn't be possible without a tight fitting lid and a gasket to keep steam from escaping.

Enameled pan lid
In short, if a recipe calls for using a lid, use it.  If not, don't.  Using a lid unnecessarily can cause excess moisture to collect inside the pot or pan.  This can result in soggy food, improperly browned meat and crispy food that's lost its crispiness.

"Universal" lid
Covering a pan, sauce pot or any other cooking vessel makes the heat act differently toward the food. This covering can be anything from the factory made mate to your pan, one of those "universal" pan replacements, an "orphan" lid from a garage sale, a dinner plate, aluminum foil or even another pan.  The effect it has on the food and resulting cooking time is effected by things like the lid's density, fit and whether or not it is vented.

My favorite glass lid w/ safety handle
Lids can be made of aluminum, stainless steel, enameled steel, ceramics or glass....or any combination thereof.  My favorite ones are made of see-through glass with stainless, flanged edging and safety or heat resistant handles. I like being able to look into the pan without negatively impacting the cooking time by lifting the lid.

The most important thing to remember is these things get hot, so handle with care and a great deal of respect.

If you have any additional information on lids, or comments or recipes please feel free to submit them! In the meantime, Enjoy!

Friday, May 20, 2011

KITCHEN TOOLS- Bowls

Mixing Bowls
One of the most used, least thought about tools in the kitchen sits there on the shelf, waiting to do your bidding....the mixing bowl.
Between garage sales, finding and inheriting, I've managed to assemble a nice variety of stainless steels....and to be honest, some of the large ones have an infamous past-as weigh room bowls at Dennis Peron's SFCBC and the San Francisco Patients' Cooperative. 

If those bowls could talk!

Having a variety makes a big difference; sometimes you need a high-walled flat bottom bowl, sometimes you need a shallow one....it all depends on what you're trying to do.

The most common mistake when it comes to these tools?  It seems to be choosing the wrong size for the job.

Stirring is very physical work...be it whisking, spooning or using a hand mixer.  Things are bound to splash over the sides-unless you took that into account when choosing your bowl.  Make sure it's big enough...and by that I mean bigger than what you're working with. Your bowl choice should be about two times larger.

That may sound like a lot, until you figure that you are adding other ingredients and will be mixing them all around a few times before you're done.

I like stainless steel...it doesn't break, it doesn't stain.  It's also great for chilling dough in a hurry.  The large ones make great salad servers, and are absolutely THE thing for mixing double and triple batches of cookie dough!  The uses are endless!

So make sure when setting up your kitchen you take a few moments and really select the right bowls...and enough of them.  1 extra large, 1 large or 2 large, an assortment of mid-size and a few small ones. They don't have to be stainless, that's my own personal preference.

If you have any suggestions or comments please feel free to send them along!

Monday, May 16, 2011

Orange You Glad I Didn't Say........?

Monday, Monday.....
Life's been busy, crazy and even slightly hair-raising at times....and this is just the beginning of the week. OY!
Jack's been feeling under the weather, so we've been going to doctors and sitting in waiting rooms a lot.  OY again!  So tonight for dinner I wanted to make one of our favorite things....Orange Chicken Stir Fry with Rice.

There are several versions of this dish...some are just chicken cut in pieces, dredged in seasoned flour and/or corn starch, stir fried then re-stirred with peppers and onions in an orange sauce.  That's fine and good.  But I didn't want anything complicated.  It had to be simple, quick and tasty.

So I took some chicken thighs (conveniently defrosted), skinned, rinsed then patted them dry.  I decided to leave them whole for the first portion of their cooking.  Partially because I wanted to retain the moisture and partially because I was being just plain lazy.

Anyway, these chicken pieces went into a bowl containing orange juice and bits of cut up garlic, ginger and onion (finely chopped-and you don't need a lot and could probably substitute dried spices for chopped from fresh).  I set it aside to marinate while preparing everything else.

The rice was easy enough...for review- one cup of rice, 1 tablespoon of butter or margarine, two cups of water. Butter cook the rice in the pan a few moments before adding the water, then bring it all to a boil before covering it for 20 minutes.   NO PEEKING!  After 20 minutes, remove it from the heat but don't remove the lid for an additional 5 minutes.  When you do, the rice will be perfect.

After assembling all the tools, spices and so on, it was time for some serious chopping!  I believe there's a natural order to things....be it cooking or rocket science (by the way, the two are NOT mutually exclusive, leastways not to my way of thinking!).  In cooking, I make sure the things that are going to take longest to cook get started first.

I cut up the broccoli and carrots first, cut sugar peas into small bits, then red bell peppers, onions, garlic, a bit of bok choy and some oranges so that everything would be ready to grab.
 
Veggies in the wok
The wok had been dry heating (no oil in it)  for a little while over a low flame.  Once everything was ready, I turned up said flame to maximum and put about 2 teaspoons of oil into it, swirling the pan carefully to spread it around.  To that I added the broccoli and carrots, stirring and stirring all the while.

Some folks like to pre-steam their "hard" veggies before wokking them.  I used to do that, too. But in I've found cooking them in the wok retains their nutritional value, flavor, texture and color. After cooking the broccoli and carrots for about 3 to 5 minutes, I added the cut sugar peas, peppers, cut up white portions of bok choy(the leaves will come later and are optional),  a bit of the garlic ginger and some onion.

That was all stir fried for another few minutes,then I tested a piece of broccoli and carrot. 
NOTE: They should still have a bit of a crunch to them

Chicken cooking in wok
I poured all this into a metal bowl and set it aside....it was time to address the chicken thighs, which had been soaking a good 30 to 40 minutes by now.  After bringing the wok back up to heat and giving it a light sheen of oil, I added the whole pieces "skin side" down.  I spooned a bit of the marination into the wok too, and let the whole thing cook for five minutes on side one and five minutes on side two.  Then I set them aside to rest.

The marination liquid was still usable.  Two tablespoons of cornstarch, a splash of balsamic vinegar (just a splash) and a teaspoon of light brown sugar turned it into a good sauce.


I got a small skillet and zapped it with some release spray (like Pam, etc.) then added the sliced oranges and stir fried them 'til they began to brown.
Oranges cooking in skillet

After cutting up the chicken, I added the oranges and the chicken to the wok and stir fried all of that, with a little of the sauce mixture.   When it started to thicken, I added the remaining veggies and stirred the whole thing around until it was well blended.  I added more of the sauce mixture, a little at a time, until the consistency was just right.  Then I adjusted the seasonings, put it over rice and served it to Jack, who was very happy.

Orange Chicken Stir Fry

There are lots of different things you can do with this base recipe.  If I were serving it to myself, I'd add some little hot red chili peppers....but that's me.  I eat fire.

So that's how I get out of the Monday blues....a little kitchen creativity.


Saturday, May 14, 2011

THOUGHT FOR FOOD - Hints - Handy Substitutions


SOME SUBSTITUTIONS

Rather than being driven mad about not having an ingredient needed for a recipe, try these substitutes....courtesy of the Crisco Kitchen website.
Here's the link:  http://www.crisco.com/Cooking_Central/Cooking_Basics/Substitution_Table

Allspice 1 teaspoon =     1/2 teaspoon ground cinnamon + 1/2 teaspoon ground cloves
+ pinch of ground nutmeg (optional)

Apple pie spice1 teaspoon
=     1/2 teaspoon cinnamon + 1/4 teaspoon nutmeg
+ 1/8 teaspoon ground allspice + 1/8 teaspoon cardamom

Baking powder 1 teaspoon =     1/4 teaspoon baking soda + 1/2 teaspoon cream of tartar
+ ¼ teaspoon cornstarch

Broth, beef or chicken 1 cup     = 1 teaspoon beef or chicken base, instant bouillon granules
or 1 bouillon cube dissolved in 1 cup boiling water

Butter   1/4 cup  = 1/4 cup Crisco Regular or Butter Flavor Shortening + 1-1/2 teaspoons water
            1/3 cup  = 1/3 cup Crisco Regular or Butter Flavor Shortening + 2 teaspoons water
            1/2 cup  = 1/2 cup Crisco Regular or Butter Flavor Shortening + 1 tablespoon water
            2/3 cup  = 2/3 cup Crisco Regular or Butter Flavor Shortening + 4 teaspoons water
            3/4 cup  = 3/4 cup Crisco Regular or Butter Flavor Shortening + 1-1/2 tablespoons water
            1 cup     = 1 cup Crisco Regular or Butter Flavor Shortening + 2 tablespoons water

Buttermilk 1 cup = 1 cup plain yogurt OR 1 cup minus 1 tablespoon milk +
1 tablespoon lemon juice or vinegar

Catsup 1 cup
    = 1 cup tomato sauce + 1/4 cup sugar + 3 tablespoons apple cider vinegar
+ 1/2 teaspoon salt + pinch of ground cloves

Cornstarch 1 tablespoon
  =  2 tablespoons all-purpose flour

Cream OR half-and-half 1 cup
  = 1/2 cup light or coffee cream (20% butterfat) + ½ cup whole milk

Cake Flour 1 cup sifted
  = 1 cup minus 3 tablespoons sifted all-purpose flour + 3 tablespoons cornstarch

Garlic 1 clove = 1/8 teaspoon garlic powder OR 1/2 teaspoon jarred minced garlic

Ginger Root, fresh ginger 1 tablespoon (minced or grated)
  =     1/8 teaspoon powdered ginger

Herbs, fresh 1 tablespoon
  =     1 teaspoon dried herbs or ¼ to ½ teaspoon ground or powdered

Lemon juice, fresh 1 teaspoon =  1 teaspoon bottled or frozen lemon juice

Mushrooms, fresh 8 ounces  =  1 4-ounce can sliced mushrooms, drained

Mustard, powdered 1 teaspoon
  =  1 tablespoon prepared mustard

Onion, fresh 1 small    =  1/3 cup instant minced onion

Onion powder   1 tablespoon     =  1/2 cup chopped fresh onion or ¾ to 1 teaspoon onion salt
(reduce salt in recipe by ½ to 1 teaspoon)

Orange, sweet 1 medium
= 1/3-1/2 cup orange juice

Pimento 2 tablespoons chopped
=  2 to 3 tablespoons chopped fresh red bell pepper

Pumpkin pie spice 1 teaspoon =  1/2 teaspoon ground cinnamon + 1/4 teaspoon ground nutmeg
+ 1/4 teaspoon ground ginger + pinch ground cloves

Sour cream 1 cup
=  1 cup plain yogurt OR 1 cup evaporated milk or whole milk
+ 1 tablespoon vinegar or lemon juice

Sugar, dark brown 1 cup packed
= 1 cup packed light brown sugar + 1 tablespoon molasses

Sugar, granulated 1 cup  = 1 3/4 cup unsifted powdered sugar (baked goods may be less crisp)
OR 1 cup packed brown sugar (baked goods will be more moist and chewy)

Tomatoes, fresh 1 pound = 1 ½ cups or 16-ounce can whole tomatoes

Yogurt, plain   1 cup     = 1 cup sour cream OR 1 cup buttermilk


If you find any other substitutes, please feel free to pass them on! 
Enjoy!

Friday, May 13, 2011

THOUGHT FOR FOOD - HINTS - Weights & Measure Conversions

You know how it is....you're all ready to cook-psyched even.  But darn it all, it seems you gotta be part mathematician and part logistical engineer in order to figure your way through some of these recipe books!
Sure there are charts, but gee whiz! Isn't there an easier way than leafing through these bible-sized editions and struggling through the small print?

The Internet is a great resource.  Lots of people have a laptop near or even in the kitchen these days....some even have a monitor on the refrigerator door!  Ain't that something!?!!

But either by choice or circumstance, not all of us are so technically connected.   So today's blog entry will be concentrating on Weights and Measurement conversions. Feel free to copy and print this list....maybe even tape it on to your fridge.  That'll show those folks with Windows on their Frigidaire doors!

POUNDS (lbs) TO GRAMS (grms)                 

1/4  lb  =   144 grms                                             
1/2  lb  =   227 grms
3/4  lb  =   341 grms
1 lbs     =   454 grms
2 lbs     =   907 grms
3 lbs     =   1361 grms                                  
4 lbs     =   1814 grms
5 lbs     =   2268 grms
6 lbs     =   2722 grms
7 lbs     =   3175 grms
8 lbs     =   3629 grms
9 lbs     =   4082 grms
10 lbs   =   4526 grms
11 lbs   =   4990 grms


OUNCES (oz) TO GRAMS (grms)

1 oz   =    23 grms
2 oz   =    57 grms
3 oz   =    86 grms
4 oz   =   113 grms
5 oz   =   142 grms
6 oz   =   170 grms
7 oz   =   198 grms
8 oz   =   227 grms
9 oz   =   255 grms
10 oz =   284 grms
11 oz =   312 grms
12 oz =   340 grms
13 oz =   369 grms
14 oz =   397 grms
15 oz =   425 grms
16 oz =   454 grms


 FLUID MEASUREMENTS
   
1 cup     =    8 fluid ozs       =        240 ml
1 pint     =    16 fluid ozs     =        480 ml
1 quart   =    32 fluid ozs     =        960 ml
1 gallon  =    120 fluid ozs   =      3840 ml

Here's hoping this helps!  If you'd like to add more info, feel free!
Enjoy!

Tuesday, May 10, 2011

THOUGHT FOR FOOD....Recipes as legacy

Iron Chef Chairmn
"If memory serves...." that's how the Chairman on the original Iron Chef show usually began his musings of the coming challenge.  He'd scratch his chin, take a bite out of a pepper and regale us with a thought or two before sending his combatants into Kitchen Stadium for a head-to-head cook off.  

I love that show....and many of the other culinary broadcasts that have come our way since Madame Julia graced us with her presence (and persistence and patience) as The French Chef.


Julia Child in her West Bank apartment
To her and the countless others who brought real food to the American table should go several generations of gratitude from home cooks, wanna be chefs and Micheline Award winners the world over.  For it was those pioneers who really gave us a kitchen consciousness.  Before that, the place was just somewhere for wifey-poo to sling hash or, in more opulent society, where the servants were sent to do it....so to speak.

From a young age I was interested in food; in how to coax flavors, mix different colors and textures...and as luck would have it, mine was a large family with lots of food holidays, gatherings and Sunday dinners.  So there was ample opportunity to work with the stuff...to learn its traditions....to build a passion.


Mom had most of her standard recipes in her head, but there were some that were so special they were written down....or their cookbook pages saved with index cards or paper clips for future reference.  You could tell when something special was going on.  Mom would bring out "the big guns," like Fannie Farmer or Joy of Cooking and scan through the recipe box until she found just the right thing.  

More often than not she'd add an interesting variation or two; partially because some members of our large family were picky eaters. But I think there was more to it than that. I think it was her creativity shining through.
My mother was the first Foodie I ever knew.  

And I soon discovered I had been born into a whole family of 'em!
Aunts, Grams, Cousins....when we got together for a get-together, be it picnic or wedding reception, everybody brought something.  Their  "speci-ality."   Mom's famous meatballs, Aunt Virg's eggplant parmesan, Aunt Anne's green bean casserole, Dad's expert hand at the grill....on and on.  

To this day, sister Carolyn and I swap recipes and exchange ideas-regardless of the miles.  It's in our blood.

Recipes are more than a means to an end...more than just a pinch of this and a dash of that.  They are bits of memory; reminders of moments shared with friends and family. They are often passed down, generation to generation as part of a legacy.

There was a time when recipes were treasured and valued as gold.  Only certain people had them.  The rest of society hand to put up with what they could figure out on their own, until the printing press, common languages and measurements and inexpensive reproductions came along.


There's been quite a lot of history between that wooly mammoth steak on the cave man's fire and Chef Gordon Ramsay's Kitchen Nightmares!


My recipe box
Even with times being tough, there's still an awful lot to be thankful for. We have blenders, sharp knives, modern stoves and so on.  We don't have to use bows and arrows to bring home the bacon.
And even when we do "rough it," we've come a long way from scavenging  on the open planes.  

Our hunting ground is a supermarket - the only things we have to deal with there are other customers getting the best deal first, sticker shock as the prices go up and the occasional botulism scare.


So as I go to my recipe box for inspiration, I am reminded of just how good it is to be alive...in spite of, and maybe even a little because of all the craziness going on in the world today. For you see, I have all the wonderful memories each treasured recipe brings and only have to start cooking to not only bring them to live, but make new ones in the process.

Now THAT'S magic!


As always, please feel free to share your thoughts, ideas, memories and recipes!  Full credit will be yours!


Thursday, May 5, 2011

THOUGHT FOR FOOD - Cooking

Cooking is important, not only as a means to prepare food so we might live.  It's about a great deal more than that!  It's about history, culture, anthropology, science, myth, medicine, wisdom....it's about family and tradition, gathering together, surviving, celebrating....the list is endless.

To say that without cooking we'd just be another set of critters at the trough is even a misconceived notion. We didn't need to domesticate animals 'til we decided to formalize our protein staples, so without cooking we'd really be just another group of beings doing what ever to survive.

What set us apart from the others out there wherever we were was the fact that we overcame our fears, figured out that fire was a useful tool and learned how to make it, then applied this technology to food and it became more palatable.

As anthropologist Claude Lévi-Strauss wrote in The Raw and the Cooked, "Not only does cooking mark the transition from nature to culture, but through it and by means of it, the human state can be defined with all its attributes"*

We've come a long way since those first home fires burned.  We've refined our skills, learned about spices and different ways to prepare ingredients and have arrived at a place where it is truly possible to experience the entire culinary world by visiting a food court.

Cooking has become everything, including a sport of sorts, with competitions and contests on t.v., online and even at local events

At the same time, famine has become more and more prevalent. Some of it is due to weather, but a great deal of it is a politically imposed form of genocide.  When will we ever learn?

If you have any comments or thoughts, please feel free to submit them.  Thanks.


*.Symons, Michael. "Cooking." Encyclopedia of Food and Culture. 2003. Encyclopedia.com. 22 Oct. 2011 <http://www.encyclopedia.com>.

Tuesday, May 3, 2011

Timing Is....Pork Chops with Garlic Sauce


Recipes, like life, require perfect timing. A roast isn't a roast 'til it's roasted, so to speak. I guess the same can be said about blogging.  The best of intentions are no match for emergencies; and when a family member is sick there's nothing else that matters.

So I'm back at it, a new installment for this new blog about Cooking and Life. Today's recipe is designed for folks who are on the medication Warfarin (Coumadin) and have to be careful about their intake of Vitamin K.

The important thing to remember about this kind of diet is consistency. Don't stop eating things like spinach, just keep eating things at the same amount. That way your medicines will be effective.

All this may seem strange at first, I know. Jack came down with a blood clot in his leg and we've had to put him on Warfarin, so it's been a real learning experience.  It's important to remember during any therapy is that you're working in partnership with your body, not against it. The medicines and treatments, the food you eat, daily exercise and fresh air are all components of this partnership. 

A positive attitude goes a long way toward wellness, too.

One way to keep positive is to have a beautiful meal.

 PORK CHOPS WITH GARLIC SAUCE

2 Servings                                 Cooking Time 30 minutes
(Feel free to multiply this recipe! Everybody will want some!)

2 tsp.  Extra Virgin Olive Oil          2 Cloves Garlic (sliced thin)
4 Cloves Mashed Garlic (mash ahead of time, cover, refrigerate 'til ready to use)
Pork Chops & Garlic Sauce
1/4 cup White Wine or White Unsweetened Grape Juice
3/4/cup Low Sodium Chicken Broth             2 tsp  Unsalted Butter
fresh ground black pepper to taste                Spray Olive Oil (Pam, etc.)
Mrs. Dash Original Seasoning to taste         
2   4 oz. Pork Chops (boneless)

Heat a skillet, turn to medium flame add olive oil. When oil comes to fragrance, add sliced garlic. cook slowly for about 5 minutes stirring occasionally. Reduce heat to low to keep garlic from turning brown.  Add mashed garlic, stir for another minute.  Add white wine, chicken stock, Mrs. Dash, pepper (if desired). Turn heat back to medium, let sauce simmer for about 20 minutes, or until garlic is soft.

While the garlic/wine/stock mixture is simmering, place a large (cast iron preferred) skillet in the oven and preheat to 425 F.

When garlic is soft, mash it while the sauce is still simmering. Then cook this sauce until it is reduced to about 1/3 cup. Lower flame under reduction to keep it warm only.

Spray the pre-heated skillet with spray oil, be careful...it will spatter!  Add pork chops and return pan to the oven. Cook first side for 7 - 8 minutes and turn. Cook for another 7 - 8 minutes.  Turn back to first side, add simmered garlic sauce, serve.

THINGS TO REMEMBER:
Consistency!  Consistency! Consistency!

Try this recipe. Let me know what you think!

Monday, May 2, 2011

Rice Without Intimidation

Rice
Rice used to intimidate the heck out of me!  It seemed no matter what I did, the stuff would always come out more like lumpy wall paper paste than anything even remotely edible.

Let's face it, at 7,000 years of age, rice had a lot of life experience compared to me.  How could I tame such a worldly thing?

Mom used to make Uncle Ben's a lot, but I had a feeling there was more...much more going on!
"There are just so many varieties of  the stuff!" I'd quip while looking over the bins, bags and boxes at the local organic food store.

Long, short and medium grain....and prepared in different forms; regular milled or polished, brown unpolished and parboiled or converted, pre-cooked (also known as "minute rice").  Some rices are sweet and high in gluten, others are hard-shelled and nutty like Louisiana Pecan Rice.  There are foreign varieties like Italian Arborio that require constant attention....including 18 minutes of constant stirring.  So many types, so many ways to cook it!  Enough to make my head spin!

I opted for plain old American milled long grain.  At least we spoke the same language!  Sometimes the magic worked and sometimes it didn't.

I started to get the hang of it with a microwave rice cooker found at a local dollar store.  It worked, so as long as I had that cooker and a functioning microwave, our rice was fine.

Then one day it happened.  The cooker's inner lid got cracked, and it ceased to function.  I was panic-stricken! We were having company that night, and rice was supposed to be part of the meal.  Our guest didn't like potatoes, hated pasta and didn't want yams....but they loved rice.  Oy!   And apparently Jack had bragged to him about my culinary abilities.

 I looked around the kitchen.  There were tons of cook books, so I grabbed a few and read.  Everybody had an opinion on every kind of rice....from Fannie Farmer to Joy of Cooking and everything in between.  I narrowed the search down to plain old long grain white rice. That narrowed the field considerably, although each had their own interpretation of that, too. But they all had a couple of things in common.

1) Measurements are usually the same - 2 parts water to 1 part rice
2) Rice should be cooked for 20 minutes
3) It should be covered that entire time
4) It should rest for about 10 minutes before removing lid
5) It should be fork fluffed before serving
6) It should not resemble lumpy wall paper paste

Some of them called for the rice to be rinsed.  Some suggested heating the rice a few minutes in butter, stirring constantly, before adding the water.  Some just suggested stirring the rice into water that's at a full boil, then lowering the flame immediately to the simmering point and covering it.

This last choice is the one I made then, and the one I still use most often. 
So that's the one I'll talk about today.

WHITE LONG GRAIN RICE

1 part rice
2 parts water
1 tsp. salt, optional


Set the water with the salt on the stove to boil - this takes less time if the pan is covered.  Once it's boiling, lower the heat to simmer and stir the rice into the water. Let it come back up to boiling then cover it with a tight fitting lid.   Cook covered for 20 minutes.

Do not....Repeat - DO NOT uncover.  Let the rice do it's work!
After 20 minutes remove the pan from the heat and DO NOT uncover it yet!  Let it sit for 10 minutes.
After that, uncover the rice and fluff it with a fork. Then it's ready to enjoy!

Fork fluffed and ready to eat
This recipe isn't right for every type of rice...some take more time, some need stirring....so the best thing I can suggest is to read and learn. I'll make some of the other varieties as we go along. The thing to remember about rice, what ever variety,  is that it is primarily a cereal.  So if you come to it with that attitude you have a  better chance of mastering its preparation.

Sunday, May 1, 2011

Of terrorists and comfort food

So much going on in the world!  Where to begin? Everybody's been talking about Usama bin Laden's death....some see it as the end of a terrorist.  Others think it was wrong.  How do I feel?  Not sure.  I'm glad he's gone....I don't know why it took so long to get him; ten years is a long, long time!
I don't believe in murder, but then again....karma is karma.

How does a recipe come out of this discussion?  Hmmmm.
On the one hand, there's the fact that UbL's gone....but on the other there's the fact that there's so much hatred in the world.

Times like these call for something familiar....favorite blanket familiar.

Think comfort food....homey and warm, like when it's winter and there's Macaroni and Cheese finishing up in the kitchen.  You can smell that tangy richness....made that special way, not too stringy or gloopy...but cheesy enough to wrap around and through each noodle like velvet.

With dishes like this, I don't do much actual measuring...it's more of a look, see, smell, taste kind of thing.  But that's what cooking's all about, eh?


The macaroni's fairly simple....although instead of just boiling your pasta in water, try adding a bit of broth or maybe a spice or two....some folks add a cube of bullion (chicken, veg or beef, what ever accent you want to play with).  Broth can have a two-fold benefit...spiking a bit more protein nutrient into the starch. Be careful of the sodium content though, some of that stuff is completely loaded with it!
Remember not to add any more salt to the water if you do that!

Let the water come to a boil before adding the noodles....this will help to avoid sogginess.  Follow package directions for your elbow macaroni....usually between 8 to 12 minutes of rapid boiling.  Check for done-ness.
You want a firm noodle...firm but not chewy.


While the pasta's on the boil, take the opportunity to shred cheese and get all your other ingredients in order.
Service for four usually needs about 1/4 to 1/2 cup or so of milk . Of course eyeballs are the best judge here....because some of that depends on the type of cheese or cheeses used.  On the cheese, up to about 1 lb, shredded not cubed if you want an even texture.  Of course we're talking meaningful mac and cheese here, so be generous on ingredients. And if you shred too much, any left-overs can be used on other things. Just store it in a tight plastic bag.

What kind of cheese depends on you, too!  Pepper Jack can be an interesting turn of phrase. Some folk might want to tone it down a bit with some regular Jack or other cheese.  Asiago is a nice flavor to introduce, especially when accompanied by Provolone...Cheddar and Colby are great too!  The list goes on! 

Drain but do not rinse the noodles.  They can sit in the strainer over a bowl for a few moments while the cheesiness takes place!

Using the same pan (because it's deep enough and already warm enough), begin the cheese sauce with a few tablespoons of butter or margarine.  Try to find a margarine that's good for cooking. Some will even say so on the packaging.  These products will not scorch or break down under the heat of cooking, unlike "spreads," which are intended only for schmeering on toast.

There's a point of contention as to whether adding the milk first or the cheese first is appropriate.  I say put the flame on low and add the milk, stirring while you add the cheese....continue stirring.  It will thicken.  If it gets too thick, add more milk, a little at a time.  When all is in readiness, add the noodles back and fold them into the sauce.  It should enrobe them.

Some people like to put this into the oven for about 15 minutes to develop a nice, golden crust on top.
Other variations include adding everything from peeled, diced tomatoes to bacon bits....sauteed mushrooms, garlic and onions....jalapeno peppers and black beans....hot dog slices....ground meat....diced chicken or turkey and mixed vegetables....tuna and peas....the possibilities are astounding!  Just make sure to drain extra liquids, remove seeds or what-have-you and fold not stir when including ingredients.  There's nothing worse than a macaroni with a broken elbow!

Well anyway, as long as there's comfort food like Macaroni and Cheese around, I think we're gonna be okay.


Submit Express SEO Services

Free Web Submission

Powered By Blogger