Friday, September 30, 2011

THOUGHT FOR FOOD - Grocery Shopping Doesn't Have To Be Gross

Site of the "dreaded deed."
Some people really hate grocery shopping.  They'd sooner get stuck with some other, far more grodie task than push a basket around looking for food bargains.  In fact, I know some people who can honestly claim that the only time they step foot in a supermarket is to pick up beer or for some other dire emergency. 
Disabled cart - my chariot.

Personally I like doing the deed.  I like comparing prices, seeing what's available and to be honest, I like driving those motorized carts around the store.
I walk with a cane or crutches; those ride-around thingies make the process so much easier.  Like the Beach Boys say....Fun ! Fun! Fun! I only wish the baskets were a little bigger.

Don't get me wrong - grocery shopping it is a chore, especially these days when prices are going up almost daily. In fact it's downright maddening to watch as coffee prices, for example, rise from $7.89 to a whopping $15.49 in one seven day span.  I know, I've seen it.  And we shop the "cheap" stores!


An intimidating sea of shelves
It can be downright intimidating....this sea of shelves. So what is one to do?  How does one get in there, get it done and get out of there without going into sticker shock?  Let's be honest....you can't.  But you can take charge of your choices, modify your eating habits when possible to incorporate less expensive items, check the ads for specials and, if need be, shop different stores for the best bargains.  Just remember to include the cost of fuel in your hunting expedition, that's the only way to get an understanding of your savings....if any.

Shop carefully.  Don't be in a hurry when gathering your foodstuff.  This isn't about just schlepping a basket around and grabbing things off shelves. You're in control of the health and well being of yourself, your household...and your wallet!

Realize that lots of stores have set up the shelves to their benefit, not yours. Look around, above and below your normal field of  vision.  Sometimes there's a deal right below or above the more costly item. These stores are literally banking on the fact that you're not paying attention.  As they say, "It's business."  So make it your business not to let them do their business on you!
Go into a store sometime when you're not shopping for the week.  Walk around and you'll see how things are placed. Call it marketing, call it manipulation. It's a real eye-opener!
Some have suggested shopping the perimeter of the store first. That's usually veggies, dairy, meat and breads first. The other items are in the aisles. It's worth considering this "map," as it gets most of the essentials out of the way first. 

Make a list before going to the store.  Categorize the list into sections that make it easier for you to find things.  If you normally start your foraging in the vegetable aisle, start your list with veggies.  Also, distinguish between "essentials," and "wanna gets, " taking care of the former before moving on to the latter. 

It would be good to have menu plans in mind before embarking on your expedition. This can be a little tricky, with prices changing every week.  Look for ads in the paper and online. Plan menus accordingly. Clip...click, print and use...coupons when they really are a bargain.  If you don't normally like or eat snails, why would you want to buy them just because they're on sale?  Impulse buying is bad for a budget!

Have an open mind. Don't be afraid to try store brands.  Sometimes they're pretty good substitutes.  For example Jack likes canned spinach....especially Popeye brand.  I understand. There's nothing like that crusty old sailor's face and name emblazoned on the label to bring back memories of childhood and Saturday morning cartoons.  But at close to $1.79 a can, we're talking a fairly expensive trip down memory lane!

So I bought one can of Popeye brand and one store brand and did a blind taste test.  Truth is, Jack couldn't tell the difference.  I might have noticed that the Popeye version was slightly more salty, but other than that it was fine.  Price comparison - Popeye brand $1.79  Store brand $1.19.  The math speaks for itself.

Chinatown, S.F.
Don't go food shopping on an empty stomach.  If you want to cause a negative impact on your food shopping dollar, going to the store with a mean case of the munchies will do the trick. It's amazing the things you'll bring home under the influence of a growling belly!  On the one hand it can open new vistas, like discovering lychee nuts.....but on the other? I don't even wanna go there!
Local green grocer
Some things are available cheaper at dollar stores.  I buy a lot of my cleaning supplies that way.  Same thing with local farmers' markets or, in my case, the local green grocer. I live near San Francisco's Chinatown, and not too far from the Mission District either, so have bargains practically at my front door! There are also plenty of Farmers' Markets throughout the city.  Talk about location!

Dollar store delights
 If you're fortunate enough to have these valuable resources nearby, take advantage of them!  The difference is astounding!  Just one example: Ginger at the local supermarket is about $2.00 for a tiny scrap.  At the local Chinese green grocer it's $0.75 for a whole hand! (that's what they call a whole ginger....and it kinda looks like a hand, too)

Food display theater
Use your senses. Learn to recognize when food looks old, feels old and smells old.  Don't trust the lighting right at the meat or vegetable counters. Go to the middle of the aisle and look at the thing under "real" lights.  If the bottom of the broccoli looks brownish or woody....if its tops have yellowish or brown patches...consider it too old for rock 'n roll.  Most certainly too old for your table!

Above all else, find ways to enjoy the task.  Don't go shopping when you're too tired.  Of course this can't be helped some times...schedules being what they are.  But when possible, go in a relaxed and unhurried frame of mind.  When possible.  I know.

If you can't do the shopping for yourself, write a detailed list and hope for the best.  If your helper is someone who knows your tastes and budget, you'll probably do fine.  But still, don't assume!  Make sure they know what's important - and if need be what options might be acceptable.  

There are times when I need help; arthritis being what it is there are days when even riding on one of those drive-around grocery carts is not an option. My grocery list for this situation is far more explanatory.  I'll include not only the item but if appropriate the brand (or off brand) name, quantity and even alternate suggestions in case the original item isn't available.

While this sounds like a lot of extra work, it's also one way to avoid the heartbreak of inferior or wrongly purchased products. There's nothing worse than friends at odds over a grocery run.  

In some stores you can save money packing your own groceries,  re-cycling grocery bags or using those cloth sacks.  Check your merchant's policy on this.

We've come a long way from hunting and gathering our food on the open planes, but it all still boils down to the same thing.  Trying to provide for ourselves and our families.   So perhaps we're not that different after all.

If you have any suggestions, comments or what ever please feel free to submit them!
Enjoy!

Wednesday, September 28, 2011

Biscuits in the Modern World

There's not a lot to be said about biscuits that hasn't been said already through the years....that doesn't mean they should be overlooked.  To the contrary!  Biscuits are important, some  might even go so far as to say mandatory with certain dishes.  And they're right!

Imagine if you will a piping hot bowl of stew without a crusty morsel or two getting dunked into the broth?  Horrors!   I know.  It's cruel of me to even suggest the possibility of such a situation.

Ingredients for home made baking powder biscuits
But you get my point.  Some foods just need a little accompaniment.  Like the difference between a solo musician and an orchestra member.  They both have talent and do what they do great....it's just that one doesn't need anybody else in a supporting role, the other one does.

Biscuits are part of that long breadline stretching all the way back through history to when the first of our ancestors pounded the heck out of something and made flour then mixed it with water and threw it on a rock in the fire. Mind you, they didn't have baking powder back then, so it would have been unleavened.

Still, imagine the "ughs" of approval around the dinner boulder that night!  Nothing like woolly mammoth stew with some freshly made cave biscuits!

Although this homey scene is fantasy, biscuits really do have a lengthy history.

Romans were issued portable breads with their rations.  They called these things  "bis coctus""  "Bis coctus" means "twice baked."  If you've recognized the root base of the term "biscotti" in that Latin, you're right!

In America, we reserve the term "biscuit" for very specific bread-types.  In England, "biscuits" mean what we call "cookies." Now the term "cooky" and "cookies" have their own language and history. We'll go into that in our upcoming holiday cookies extravaganza - a week of recipes, info and more in November!

At this point, I do want to give a shout out to a great website.  It's one I depend on for a lot of the food history info you see in this site.  Food Timeline. org.  Here's the link - http://www.foodtimeline.org!

Anyway, back to the action.
Life goes on, the cave people get tired of camping and make houses...they master the art of raising crops and improve upon their culinary skills. Some become Romans and bring the idea of  "bis coctus " into being.  Of course knowing their propensity for "incorporating" other cultures into their own, no doubt "bis cotus" had its origins on some other shore.
No matter. It all leads up to now where we have mixes, brown and serves and even fast food biscuits as possible accompaniment to our daily fare.

So how do we justify this starchy disk in these days of health consciousness and loosing weight?  We don't. We don't have to.  As in the rest of life, what someone eats is a personal choice. Besides, who said biscuits have to be unhealthy? Remember, they can be made using whole grains, just modify the recipe to allow for the density. And if you're someone who should watch their carbohydrate intake, there are great recipes out there that will allow you the enjoyment of biscuits without the no-no factor. That's why God made the Internet!

Check out this site, among many others, for diabetes recipes and info: http://www.informationaboutdiabetes.com , it's one of a ka-zillion sites out there just waiting to help you!

But enough of this talk already!  Let's cook!

BASIC BAKING POWDER BISCUITS
Recipe makes about 24 1 1/2" round biscuits       Preheat oven to 450 degrees

1 3/4 cups sifted flour   
1/2 tsp. salt (optional) 
3/4 cup milk
3 tsp. double acting baking powder
4 to 6 Tablespoons butter, margarine or shortening (or a combination thereof) solid and slightly chilled.

Dough leaving side of bowl
Sift flour again with baking powder and salt.  Cut the butter into the flour.  Make a well int the center, pour in milk then work the flour/butter combination into the milk.  Keep working until the dough freely leaves the side of the bowl.

I use a wooden paddle type spoon for this, so the heat of my hands doesn't mess with the dough. 

Turn onto a lightly floured surface.  A sheet cake pan or sided cookie sheet works wonders here.  Much better than having that mess all over the counter. Or you could try taping a few sheets of waxed paper to the counter if you want to for easy clean up.  Either way works, just don't go too wild with the rolling pin on the waxed paper....sometimes it tries to peel up and join the dough!

Knead your dough gently and lightly, folding it only 8 to 10 times. Cut this kneaded clump in half and let one half rest in the bowl while you roll the other out to your desired thickness...about 1/4 to 1/2 inch (depending on  how puffy-tall you want your biscuits).

Cut the dough into shape using a cookie or biscuit cutter that's been slightly floured.

Cut biscuits
Cap biscuit cutter
NOTE: for all you recycling fans out there, try using the caps or lids to things.  I use the release spray caps.   Being an arthritic, this re-use is as much a form of revenge as it is recycling.  See, it's hard for me to get those bloody things to snap off like they're supposed to.  So once liberated, I don't put them back.  Rather than have a bunch of caps laying around, I've found other uses for many of them. Stash cups for paper clips, bin cups for some of my larger spice jars and of course cookie and biscuit cutters! Go green!

Once cut, place the newly formed biscuits on an ungreased sheet.  While you might be tempted to give a distance between each doughy disk, when it comes to these baking powder biscuits - closeness counts!  Rather than having flat crackers, you'll have puffy, tall goodies if you don't space these things far apart. Seriously.  It's better for them to just touch one another, like those tube biscuits we all grew up with.  The closeness inhibits spreading, allowing the little bread-lets to rise together, shoulder to shoulder like a sheet full of Roman soldiers, facing the heat with brave determination.

Out of the oven, ready to eat

Okay, then put them in the oven and bake 12 to 15 minutes.
Serve piping hot with honey and butter, or as a side dish with stews, roasts, chili...you name it.

ALTERNATIVE:
To make drop biscuits, simply use 1 cup of milk, stir dough for only one minute.  Drop by spoonfuls onto an ungreased sheet and bake 12-15 minutes.

YUM!

As always, feel free to share your ideas,  recipes and comments! 


Sunday, September 25, 2011

Remembering Tom and Breakfast For Dinner

Good food...humble fare
Humble fare on a Saturday night....too tired....don't wanna cook.  
Tom King Solomon Jones
It's been a long day getting ready for, then attending our friend Tom's memorial service.  Tom King Solomon Jones was a force in the Medical Cannabis Community; his physical presence will be sorely missed, but his presence in the movement will remain forever. 

He was one of the first people I met at Dennis' Market Street facility.  First there was Hazel, then Teri then Tom.  Long live Tom, long live 'em all!  The service was nice; this was the second one we attended actually.
Dennis 1444 Market St. @ 1997
Some people reverberate in life, their passing causes waves of the need for friends and family to be together...to remember.


The first memorial had been a bit more formal and was held early in the day.
This second one was an outdoor event in Golden Gate Park.  It was foggy and damp, but there were people we hadn't seen since the Co-Op closed. We laughed and cried, as much for seeing one another again as on Tom's behalf. 

It was wonderful, healing. Each hug, each smile soothing some deep pocket of our souls.We remembered Tom,sang, had food, shared our healing herbs after the traditional 420 blessing.  We talked about the real need of a Medical Cannabis Community Center.  Then we sang some more.


On the way back to our apartment, my heart and mind were so full....I whispered a prayer that some day, some how we could make the Medical Cannabis Community Center a reality. 


Once home and changed into our comfies, we were relaxed enough to feel hungry.  There'd been food at the gathering - some day I'll talk about the gastronomical fun to be had at a Community bash.  I just don't want to get side tracked.  

Suffice to say, there'd been food.  We didn't eat much; too busy catching up with everybody to grab a plate. 
So there I stood in the kitchen doorway, not wanting dinner.


The first thing that came to mind was breakfast.  "That's certainly not dinner."  I said to the cat, who is usually terribly interested in kitchen related things. "Okay Wylie, up on your stool. Let's find something."   


Wylie T. Katz

I swear our kitty must have been a chef in a former life.  He sits on his perch - far enough away from the work surface but near enough for him to watch.  And he really watches.  Sometimes I swear I see him wrinkling his nose in disapproval over something I've done. 


So while he got settled in, I parroosed the pantry.  My eyes paused briefly on the Jiffy Baking Mix.  Pancakes? Too much work. Cold cereal? Too cold.  Oatmeal?  Not tonight.  Grits.  Hmmmmm.  Too tired to argue, I grabbed the container.  I also found some corn meal and brought it to the table.  Why cornmeal? You may well ask!  It actually improves the flavor and texture...if done right that is.  Done wrong, it'll create little yellow balls that are impossible to break down.  So if you don't want to add the cornmeal, don!t.  It's okay.
"This is gonna be good." I smiled.  Wylie looked at my findings, seemed to loose interest and hopped down.  I'm sure he was hoping I'd opt for tuna salad.  That can was just sitting there. He'd have been able to bribe a tiny morsel with a well calculated mew, but grits?  To him they weren't worth the effort.

Jack likes his grits "cereal style,"  that is with brown sugar, butter and milk in a bowl.  The consistency he likes is that of pudding - if pudding had goose bumps.  Not lumps, just texture.


I like mine any number of ways.  Most favorite is buttered grits with country gravy, sausages and eggs. These grits are thick, like stiff peak mashed potatoes.  But I like "cereal style" too.  Especially when I don't want to fuss. 


NO FUSS CEREAL STYLE GRITS

2 1/4 cups water (if not adding cornmeal, reduce to 2 cups)
salt (optional)
3/4 cups grits (I use the 5 minute kind)
1/4 cup corn meal (optional -remember to adjust the milk measurement accordingly)
butter or margarine softened
milk warmed

Rapidly boiling water
Use a large enough pot to allow for cereal to expand without spilling over.  Fill with water, cover and heat  to rapid boil.  Lower flame, uncover pan. Add corn meal, stir with wire whisk then cover and cook for 3 minutes.  Uncover and stir with whisk.  Add grits gradually, continuing to whisk while doing so.  

Whisking is essential
Once added, whisk around a few more moments then cover and lower flame to simmer for 5 minutes.  Then remove from heat, keeping it covered for 5 more minutes.  Then whisk it around.  This is where having a larger pan comes in handy.  Add some of the butter and whisk some  more.


If every body wants brown sugar on their grits, you can add it at this point, whisking  it in.  You can add some milk at this point too...whisking while doing so.   This whisking breaks down any large lumps and insures everything gets mixed well.  Spoons don't do this.


Dinner is served
Serve with milk and a bit more butter drizzled over the top.  I always put some extra brown sugar on the side in case anybody needs more.   

NOTE:  For those with dietary issues - you can use a brown sugar substitute with this dish and it'll taste just fine. 


Friday, September 23, 2011

End of the Month Souffe'

Well, here it is....getting near the end of the month and our pantry is looking somewhat ravaged.  And why not?  Since stocking up 30 days ago, we've been cooking (and eating) our way through its contents.  But we still have enough left to get us through, providing we use our larder wisely.


Of course it helps to have planned for this eventuality. 


Every time I go to the store, I pick up a few "extra" things.  Call it insurance. I'd rather do that than be panic-stricken, wondering how to make a meal out of crackers and capers! (Although I might try doing something with that some time....stay tuned! :) )


Looking around  the pantry today, I spotted the ingredients for one of my favorite things to cook....believe it or not, souffle. In this case, Tuna Souffle'-because that's what we had on hand.   

Some people are intimidated by it...all the whisking and beating and thissing and thatting; so much to do!  And so many things to worry about!  White sauce, eggs, egg whites....ugh!  The first time I ever attempted one, it looked like....well, let's just say it didn't look like a souffle!  The thing didn't rise and it was raw in the middle. Thankfully, mine was not the only dud. 


Our Home Economics teacher (shout out to Mrs. Schlosser) was there with patience and sympathy.

As she walked around the room examining each dish, the teacher pointed out what might have gone wrong.  In many cases we simply hadn't done the eggs right.  Either the yellows had started to cook when added to the white sauce creating "scrambled egg islands," or the egg whites weren't beaten enough to help make the dish rise to the occasion.  The other problems were oven not hot enough, cooking time, oven doors slamming and not keeping the oven door closed until cooking time was done.  Picky! Picky! Picky!


When she got to my dish, the instructor nodded.  "What do you think went wrong?"  I looked at her squarely and said "I did."  Naturally.  

Home Ec and I weren't exactly getting along to that point. I mean, wasn't I the kid who just about sewed their hand to the skirt they were supposed to be making for a class project?  The one who sewed the skirt pleats inside out once their hand was liberated from the sewing machine's death grip? And wasn't I the one who was transferred over to cooking to save myself from myself?


Now this....this....puffy cakey thing, for lack of a better term, was about to be my undoing!  Ugh!  


The teacher, a true saint, smiled.  "Looks like you didn't do the roux correctly. Probably not enough flour."  If cooking ever needed a CSI, she'd have been perfect for the job!


The next day we tried it again....and voila!  It worked!  The thing puffed up like it should and was done clear through!   All it took was a bit of patience and a lot of attention to details. 

Those two things still hold true.  Patience and attention to details. You can't rush through making a souffle'...but you can use short cuts.  We'll get to those in a few moments.  But first things first.


BASIC 4 EGG CHEESE SOUFFLE'

Pre-heat oven to 350°
4 eggs (white and yolks separated)
    1 cup milk,warmed
    1/4 cup flour
    1/4 cup butter
    1 1/2 cup cheese grated
    1/4 tsp creme of tartar (optional)
    FOR TUNA SOUFFLE', add 2 cans of drained tuna, 2 diced green onions

Butter the bottom and sides of a large, tall walled bowl. It should be deep enough to allow your souffle' to expand and rise to almost double its size.
Sometimes I coat this with a bit of fine seasoned bread crumbs or a mixture of bread crumbs and Parmesan cheese.  Set it aside.


Beat the egg yellows until they are smooth. They'll probably even get a little lighter in color and stream evenly when you raise the whisk out of the bowl.  Set these aside.
The egg whites will be handled a little later...for now just make sure there are no bits of egg yellow floating in them.
Egg whites are finicky...they won't whip up if there are any impurities hanging around, even if those impurities are other egg parts. Sheesh!

Anyway....
Prepare your roux by melting about 1/4 cup of butter in a deep pan, as it's melting add 1/4 cup of flour and whisk, whisk whisk or stir, stir, stir while this cooks.  The flour/butter mixture should thicken and turn light brown.  (If you're using whole wheat flour it'll get darker than with regular flour). Turn off the heat but keep pan on the burner.

Add a small amount of the roux to the milk and mix. Set the burner on low,then add this milk/roux mixture back to the remaining roux while stirring. Stir until fully blended.  The roux will thicken the milk, which is a good thing.  If you go no further, you have made a white sauce.  Gee!  But we're not done yet.

Tempering egg with a little roux
Reduce the heat. Add a bit of this roux stuff to the egg yellows while whisking. This is how you "temper" the eggs-that is, add them to a hot ingredient without partially cooking them first. Once you see that the eggs and roux have incorporated, add it all back to the remaining roux/milk mixture in the pan...continuing to whisk over a low flame.

Once this is all mixed together, you can add the cheese. Stir constantly while the cheese melts.  If you go no further, you'll have mastered a basic cheese sauce.  Yay! But we're still not done.  Turn off the flame and let this rest while you handle the egg whites.

This is a make or break situation.  Done right, your souffle will be light, airy, soft and moist.  Done wrong, you'll have a dry, hard, springy thing that may or may not be edible.  Maybe as a bread? Hmmmm.
Beating egg whites
Eggs softly peaked
Watch carefully as your egg whites develop.  Some people use cream of tartar to help with this process, but its not necessary.  Sometimes it even makes them too stiff, but what ever is your preference so be it.
Personally I don't use cream of tartar in souffle', preferring it in meringue.

Folding egg white into batter
Now comes the next important step....folding the egg whites into the batter.  Notice I said "fold" not "stir" or "mix" or even "incorporate."

Batter and prepared bowl
You want the egg whites to still be and act like egg whites, so the batter is going to look wrong.
Our Home Ec teacher gave us a hint that still rings true today...when it comes to souffle' the wronger it looks the righter it is!

Next, pour the batter into the prepared bowl and put it in the oven to cook for 30-35 minutes.
While that happens, and if you want, you can make a nice simple sauce utilizing some of the steps we worked on at the start of this recipe. Of course, you'd use a lot less flour!  White sauce, cheese sauce, you name it.  Although not necessary, such a thing would add an extra dimension of flavor to the dish

WHITE SAUCE FOR SOUFFLE'
 1 cup milk
3 Tablespoons flour
3 Tablespoons butter or margerine

Put butter in pan, add flour and whisk over heat until butter and flour thicken.
Add milk and continue to whisk while this mixture thickens more.  Season with salt and pepper to taste. You can add other seasonings too. Some folk even add a bit of nutmeg.


The finished product, Cheese Souffle' with White Sauce will be an unexpected surprise for end of month dining. You don't have to stick to just cheese, either.  Add some tuna, chicken, ham or beef...veggies like diced onion, artichoke hearts, shaved carrots, peas...the sky's the limit!


Thanks to my Home Economics teacher, I learned that cooking is more than a chore and that making a souffle' can be a lot of fun.

Experiment! Enjoy!

Souffle' with white sauce and salad

SHORT CUT!          SHORT CUT!         SHORT CUT!
 
Sometimes there just isn't time to make a conventional white sauces. That's why God made condensed cream of whatever soups! They come in lots of different flavors and sure cut down on the preparations!
Of course you'll still have to make the roux, no way around that. The roux contains the flour that helps to hold the whole thing together. 
I learned that the hard way in Home Ec class.


Tuesday, September 20, 2011

Culinary boredom...Chicken Adobo to the Rescue!

I wonder how chicken got such a bad rap?  Know what I mean?  Why is it that when somebody's afraid they're called "Chicken."  Why not something more suitable like, gee....like Turtle?  After all, don't turtles hide in their shells 'til the coast is clear?

They're so "chicken" they bring their hiding places with them!

I have yet to see a chicken do that!  Oh, I understand when you scare a clucker, they run away.  They sure can't fly worth a dang.

Maybe they're afraid to fly. Hmmmm.  A chicken being chicken. Hadn't thought about it quite like that before.

Chicken...again?!
Anyway....seems we eat a lot of chicken in this household.  And although there are a million different ways to cook it, sometimes when I see that packet of poultry sitting there, it's all I can do to keep from making peanut butter and jelly instead. 

Not that I'm ungrateful, it's just....well....

"You again....!" I heard myself say this morning when I set the stuff out to defrost.  "...Didn't we just have you the other day?"   What to do, what to do?   We've had it fried, stir fried, fricasseed and stewed, baked, broiled, boiled, grilled, stuffed and skewered....in soups, in salads and in sandwiches....and to me, in its most  ironic form...with eggs.

After that, what else is there?

Sure, I could start the rotation over again....fried is always nice. Grilling's nice, too.
But darn it all, I wanted something different.
Something ethnic....and not a burrito.  Been there, done that one too.

I was just about to start preparing for grilled "Chicken Whatever" when it hit me! Something we had years ago at a friends' house. Chicken Adobo.  Suddenly I was excited!  The kitchen shimmered with new light!  Even the skillet was smiling....and if you know anything about cast iron, you know how difficult that can be!

Vinegars and Soy Sauce
Chicken Adobo is a wonderful dish of Filipino origin.
It's one dish that shouldn't be left on the back shelf.
Did I still have the recipe?!?
Could I fake it?  Or was I too chicken to try?

"Well, that tares it!" I said to nobody in particular. "No brain of mine is gonna call me a coward and get away with it!"  And with that I pulled out my big recipe box and rifled through the many cards until at last it was found. An adaptation I came up with after that memorable evening meal. Chicken Adobo. Yay!

Scanning the ingredients I was pleased  to note we had everything here in the house. No last minute store runs!  Another Yay!  I could serve it with rice. Yay again!  Rice and a nice green salad.  Triple back flip off the high diving board Yay!

This household would not fall victim to culinary boredom....not on my watch!  At least not this night.

CHICKEN ADOBO

3 lbs. skinless, boneless chicken breast meat
1/2 lemon freshly cut
4 to 6 slices of lemon peel
1/4 cup vinegar (I used a combination of Balsamic and Apple Cider vinegars)
2 or 3 dried bay leaves
1 Tablespoon soy sauce
1 head of garlic, crushed
2  green onions, chopped 
OPTIONAL - 1/4 teaspoon ginger, chopped fine
1 Tablespoon butter or margarine 
4 quart sauce pan with lid
1 teaspoon black pepper
Water, apple juice or weak chicken broth (or combination of all three) to be added as and if needed
OPTIONAL - 1 or 2 small apples, sliced and one dab of butter

Wash the chicken thoroughly-you know where it's been! Pat it dry with a paper towel. Rub all over with lemon. Squeeze lemon juice over chicken and let sit while you get the other ingredients together.


Add vinegar, soy sauce, bay leaves, lemon peel and about 2 teaspoons of the garlic in the pan.
Stir this around over a medium heat for just a few moments, then turn off the heat.

Cut chicken into serving size pieces then put it in the pan.

Chicken added to liquid
Put the pan over medium-high heat. DO NOT STIR.  Do not stir until the vinegar/soy mixture begins to boil.  Once the vinegar/soy mixture starts to boil you should give everything a good stir to make sure the chicken has been coated evenly. Then set the cooking flame to low, cover the pan and let it simmer for about 30 minutes.

Check on it once in a while. Give it a stir, give it a sniff. It should smell tangy. There should be enough liquid so that the chicken is mostly submersed.  If it looks like you need some additional moisture, add some of the water/broth, stir everything then cover it again to resume cooking.

Garlic, green onion, apples, lemon peel
While this is going on, heat a large skillet and add the butter, apples and remaining garlic (ginger if you chose). Cook, stirring often, until the apples are browned and slightly softened, garlic is golden brown and soft. Then set it aside and  prepare the rice and salad.  

After 30 minutes, the chicken should be done.  Remove it from the liquid and add it to the apples, green onions and garlic.  Return the garlic pan to the flame.  Cook, stirring often, until the chicken and garlic join forces...about 3 to 5 minutes or until the chicken has browned, then add this mixture back to the liquid.
Adding it all together

Stir it around over a low to medium flame so that all the ingredients get acquainted, then lower the flame and let simmer about ten minutes, then that's it.


Chicken Adobo with Apples.  I know....it's not "authentic" with the apples, so make me stand in the corner.

Chicken Adobo and Rice
There you have it.  Give it a try!  Don't let anybody call you chicken!

Sunday, September 18, 2011

PRODUCT REVIEW - KITCHEN TOOLS - Tribute to An Ancient Mixer

I sing the praise of a wondrous thing....a hand mixer from a bygone age.  It comes with its own cabinet, suitable for hanging on a wall or keeping in a drawer....but who'd want to? 
May I introduce....drum roll please......
the Hamilton Beach Scovill model 110.  This hand mixer is a dependable work horse.
Hamilton Beach Scovill Model 110
It has remained alive and well used in my kitchen for many, many years....long after other, more recently manufactured mixers bit the dust. 

I'm not just talking those cheap Kitchen Gourmet versions they sell at the corner drug store either! I'm talking Black & Decker, Sunbeam...some name brands here.  And not only that, some of 'em were full sized table top numbers, like  the Sunbeam stand mixer. Couldn't stand up to the almost daily batches of cookies I had to make while working at the Co-Op.  
The day that fancy mixer died, good old 110 saved the day.

Model 110 in cabinet (closed)

Considering its size and more importantly, its age - there's a lot to be said for the old 110!  In its time, from the mid '60s  through the early '70s, it was probably considered downright groovy.  


We've had this beauty in our family since around 1992, when Jack and I were just beginning.  In fact he bought it for me at a yard sale. My old hand mixer was on the blink and he figured it would work until something better came along. I went right home and used it to mix some cookie dough.  It was pretty much love at first use, other than the power cord's propensity to fall out of its socket. Oh well.


Things I like about the HBS model 110
1) It still works  (duh)
2) The cabinet. I've tried hanging it on a wall and it works good that way, too.
3) It still works
4) The beater release is not complicated
5) The beaters are bigger and heavy duty

6) Feels well built, well balanced
7) Vintage appeal
8) It still works

Power cord problem
Things I don't like HBS model 110:
1) The power plug tends to fall out of the side mounting
2) Not enough power for certain mixing jobs
3) The power lever should stick out a little more
     Other than that, I have no real complaints.  I'd be panic stricken at this point if Old 110 suddenly bites the dust.   

When I use it, I imagine something like the Brady Bunch kitchen...Ann B. Davis as Alice at her station (Gawd, those orange walls!) using this mixer with some avocado colored Pyrex bowls. 

Ahhhhh....those innocent times....nice to look back on these days, eh?

Retro like the Brady Bunch
So here's to the Hamilton Beach Scovill hand mixer, old 110....long may you run!


Rating : 5 out of 5 Mixing Bowls, even with the cord problem. Considering it's age, it's still going strong!

Friday, September 16, 2011

Turkey Burger Tacos and Courage

Ingredients for Turkey Burger Tacos
"Courage...."
I thought while folding the freshly grilled tortilla across its concocted innards. "....even if it doesn't look right, it should be edible!" But I knew better.  Sure, it would pass in my home.  Home's where sometimes  presentation means somebody remembered the napkins.

But it wouldn't do, just wouldn't do if I had any hope of competing on shows like America's Master Chef.

I caught my reflection in the glass cabinet and shook my head.  "Courage?  That's the least of your problems!"

See, I'd done a crazy thing.  I sent in my email application for season three of America's Master Chef....did it without thinking twice. Did it without thinking once, even. Did it because the stupid waffles, waffles ferchrissteaks, came out perfectly.  Not one dud.  And with the ancient waffle iron, no less.  Waffles....and suddenly I wanna go cook before Chef Ramsay!  Sheeh!

My face looked back at me with grave determination.  "Cook like you mean it, study....learn,..... pray." Sounded like my Kitchen Spirit was at it again.  "Yes, Grasshopper..."

"Oy!"  With that, I returned to the present moment. 

Ground turkey meat
I was making an experimental dish for dinner....this involved two things one, the ingredients and the other....hungry humans.   Why I wanted to play mad scientist when we were having company was beyond me, but hey.   If it didn't work out, I could always resort to waffles.

Hmmmmm.....Courage.

What we had going on was an adaption of Turkey Burgers.....Turkey Taco Burgers.  Why not?  Blame it on the tortillas, of which we had an abundance.....and the ground turkey.  Ground turkey has never been a household favorite, but ground beef was $14.99 for three pounds. Ground turkey was $6.59.  Once I got over the sticker shock, the choice was a no-brainer.  Even though I'd be met with some resistance on the home front. 

See, Jack's a purist when it comes to burgers....he'll try to be enthusiastic about ground turkey, but very rarely finds it a good substitute for beef.   And as for ground chicken, Textured Vegetable Protein, or Soy....let's not even go there.  He'll eat it if offered by a host or hostess but at home....Nada.

I'm always trying to figure out how to make the ground turkey thing work.  I've succeeded with versions of meatloaf and chili, but wanted something different.  The vision was a turkey burger served on a tortilla, trying to incorporate the best of both worlds. And if it flopped, so be it.  The dinner guest was a last minute addition to the line-up anyway.  I wondered if he liked waffles.

NOTE:  Because ground turkey is so moist, it's best not to add any egg. It won't help the patties hold shape. It'll just make things more soggy.   Usually I use something like rolled oats or oat bran or another bran as kind of a binder....a replacement for bread crumbs.

Crushing the tortilla chips
This time I wanted to infuse the meat with a bit of "Mexico" from the word jump.  So I got some tortilla chips and crushed them with my trusty rolling pin.  Crushed 'em til they were crumbs.  Then to that I added a few spices; garlic powder, a dash of dried onion, a speck of cumin....then added it to the ground turkey.  To that I added some very, very, very finely chopped green bell pepper, a finely chopped green onion and a dash of chili powder.  Then I stirred the whole thing around until it was well blended.

I took this opportunity to chop some tomatoes, lettuce, avocado  and cheese to stuff the tacos.   I also took some of the tomatoes and put them in a skillet with onions, garlic, chili powder and a dash of cumin...this would qualify as a sauce...at least for this first experiment.

Turkey patties browned and ready
After making sure the cast iron skillet was hot I coated it with a very small bit of grape seed oil.   Then I shaped the ground turkey into patties and began cooking them.   Five minutes on side one seemed to bring the right shade of brown to them, so I flipped the over and did the same.  When they were done, I set them on wire cake racks to drip any excess grease.

Then I heated the tortillas over an open flame on the stove-which had been impeccably cleaned-and set them aside on a plate.  Then it was all about construction. 

I didn't want the "standard" taco fold,  I wanted the dish to be somehow reminiscent of a hamburger.  That meant something a person could pick up in their mitts and shove into their faces....like a burger-but with a lighter bread component.

Pan browned Origami
I put a tortilla in the middle of a plate, sprinkled a small dab of cheese in the middle then added a turkey patty.  So far, so good.   The cheese would act like a glue.  I'd need more "glue" on the fold side too. So I added some of the pan "sauce" and a bit of chopped avocado, then topped if off with the "glue," er, I mean the cheese.   Looked okay.   
I decided to put the finished product on a bed of lettuce and tomatoes rather than putting more stuff inside.

Then it was Origami time......I folded the sides over, then folded the ends in on themselves, creating two "tabs."  Finally I brought the two "tabs" together across the top of the thing and pressed down.  The tabs popped apart, but otherwise the thing held its shape. A quick minute or two on the heated cast iron skillet seemed to persuade the little buggers to stay put.   And it didn't look too bad, either.

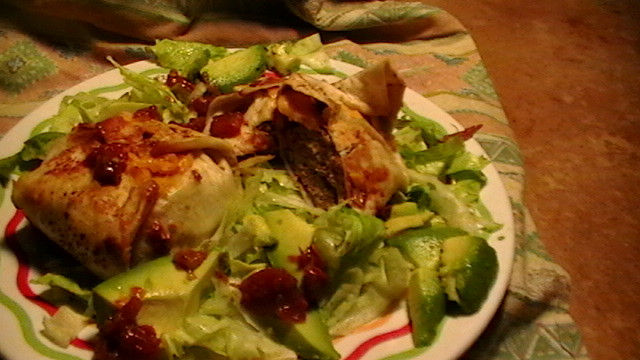
Turkey Burger Tacos 
Seeing that, I continued until all eight patties had been wrapped in their tortillas and finished with a moment on the heat.   Once the things were plated, they looked edible....even a bit interesting.  But would they be good?

Would they pass Jack's scrutiny?  Would our dinner guest like it, or long for waffles?

Turkey Burger Taco cut in half
I soon found out.   The meal was a qualified success.  Next time I'll serve a side of refried beans, and perhaps offer sour cream as a condiment....but other than that, there were no complaints.

While cleaning the kitchen after our meal, I saw my reflection in that glass door again and smiled.
"Courage..." I whispered, "courage and craziness.  Why not?"

Thursday, September 15, 2011

KITCHEN THOUGHTS - Cooking and "Me Time"

Busy, busy, busy day!  I woke up thinking there's be a few moments to myself then the phone calls started. Then the errands started piling up-you know the kind.....can't be put off, needing immediate attention and there's nobody else who knows how to do it just right.  So much for "me time!"

"Me time..."  I thought back to when there were hours, even days of the stuff. I have reams and reams of paper covered in poetry, prose, songs, artwork, ideas, blueprints.....cassette after cassette of songs and stream-of-consciousness compositions....even rolls and rolls of old film. all stored lovingly in three ring binders and boxes awaiting further attention.   

Present day "me time" happens in what feels like 15 minute chunks during the day, usually in the morning, and the night after every one else is asleep.  Luckily, I'm an insomniac so the night hours work for me. 


The kitchen...THE place for "me time"
Some chores qualify as "me time," cooking for example.  For me, creativity in the kitchen is a real sanity saver! It's a chance to let it all hang out....go a little crazy....ye-haw!

Sometimes it's quiet as church, sometimes rockin' with favorite tunes in the background...this  kitchen is at once meditation and dance hall, laboratory and artist studio. And if it means once in a while I'm found baking something at 3 a.m., so be it.   Don't worry, I'm fine....I'm in the kitchen and breakfast is bound to be something yummy!'

Tuesday, September 13, 2011

Yams To the Rescue!

"What's cookin'?" Jack asked as he came into the kitchen, "What ever it is, sure smells great!"

"An experiment..." I paused to look up at his face, "an experiment in pork chops."   My favorite guinea pig nodded and smiled.  His faith in me a restorative to my sagging spirits.  See, things had been going horribly wrong up to that point.

True, the pork chops, garlic, onions, apples and green peppers were filling the apartment with a wonderful fragrance....but the rice had already gone awry turning into a starchy ball of yuck before my eyes. Neither of us was in the mood for grits, again.  Noodles? Spuds?  Hmmmm. 

I was on the verge of giving up when he stopped by. 

I looked up from my handiwork, hoping I could live up to Jack's confidence in me.  "Well, the pork should be good at any rate. But I'm thinking of a  couple of alternates for side dishes.  Sorry. I know you wanted rice."

"Anything you do will be fine," he said, patting me on the head. "just no potatoes. Okay?"   Well, I thought, scratch that idea!  I looked around the kitchen.  What to do? What to do?
Add caption

My eyes fell apologetically on the basket of potatoes...
"Sorry guys," I quipped, "he's just not that into you."

But....there in that same basket lay the meal's salvation.  Yams!  Beautiful, flavorful, colorful Yams!  They would be a perfect compliment to the Pork Chops and Apples!

Suddenly my sinking heart was soaring skyward!  Those wonderful red gems, so often relegated to holiday side dishes or hidden in pies, these humble beauties would bring this meal home!  I grabbed a couple out of the basket, looked at the clock and commenced with the preparations.
There wasn't time for anything fancy, and at this point I wasn't in the mood.   There wasn't a lot of time, so what ever did would have to be, as we say in the computer geek world, "quick and dirty."

A simple thing, really....made even easier by the invention of the microwave.    
MICROWAVE?!!?  Yes.  Considering how long it would take to cook 'em via the more traditional route, the microwave was the only way to have everything finish at the same time. Sometimes a girl's gotta do what a girl's gotta do.

So after a good scrub, I scored each tuber with an "X" on two sides, set them on a paper towel in the microwave to cook on high for five minutes. After that, I flipped them so the underside was on top and let them cook for another five minutes on the same high setting.  The flipping is important.  It insures everything is done evenly, and keeps the texture from getting what I call "microwave weird."

While they were being zapped,  I finished the chops then got everything ready for service by putting some of the apples, onions, garlic and green peppers around them. Of course a few stray bits made their way on top of the chops too, Made for a better presentation. Then I buttered the yams, added some lettuce and tomato slices to the plate called Jack in for dinner.  Boy, was he happy!

From disaster to dinner in ten minutes flat!   Whew!
I'll be blogging the pork chop recipe soon, just wanted to get this yam thing out right away.
If you have any suggestions, ideas or comments feel free to submit them!

Submit Express SEO Services

Free Web Submission

Powered By Blogger