Friday, September 23, 2011

End of the Month Souffe'

Well, here it is....getting near the end of the month and our pantry is looking somewhat ravaged.  And why not?  Since stocking up 30 days ago, we've been cooking (and eating) our way through its contents.  But we still have enough left to get us through, providing we use our larder wisely.


Of course it helps to have planned for this eventuality. 


Every time I go to the store, I pick up a few "extra" things.  Call it insurance. I'd rather do that than be panic-stricken, wondering how to make a meal out of crackers and capers! (Although I might try doing something with that some time....stay tuned! :) )


Looking around  the pantry today, I spotted the ingredients for one of my favorite things to cook....believe it or not, souffle. In this case, Tuna Souffle'-because that's what we had on hand.   

Some people are intimidated by it...all the whisking and beating and thissing and thatting; so much to do!  And so many things to worry about!  White sauce, eggs, egg whites....ugh!  The first time I ever attempted one, it looked like....well, let's just say it didn't look like a souffle!  The thing didn't rise and it was raw in the middle. Thankfully, mine was not the only dud. 


Our Home Economics teacher (shout out to Mrs. Schlosser) was there with patience and sympathy.

As she walked around the room examining each dish, the teacher pointed out what might have gone wrong.  In many cases we simply hadn't done the eggs right.  Either the yellows had started to cook when added to the white sauce creating "scrambled egg islands," or the egg whites weren't beaten enough to help make the dish rise to the occasion.  The other problems were oven not hot enough, cooking time, oven doors slamming and not keeping the oven door closed until cooking time was done.  Picky! Picky! Picky!


When she got to my dish, the instructor nodded.  "What do you think went wrong?"  I looked at her squarely and said "I did."  Naturally.  

Home Ec and I weren't exactly getting along to that point. I mean, wasn't I the kid who just about sewed their hand to the skirt they were supposed to be making for a class project?  The one who sewed the skirt pleats inside out once their hand was liberated from the sewing machine's death grip? And wasn't I the one who was transferred over to cooking to save myself from myself?


Now this....this....puffy cakey thing, for lack of a better term, was about to be my undoing!  Ugh!  


The teacher, a true saint, smiled.  "Looks like you didn't do the roux correctly. Probably not enough flour."  If cooking ever needed a CSI, she'd have been perfect for the job!


The next day we tried it again....and voila!  It worked!  The thing puffed up like it should and was done clear through!   All it took was a bit of patience and a lot of attention to details. 

Those two things still hold true.  Patience and attention to details. You can't rush through making a souffle'...but you can use short cuts.  We'll get to those in a few moments.  But first things first.


BASIC 4 EGG CHEESE SOUFFLE'

Pre-heat oven to 350°
4 eggs (white and yolks separated)
    1 cup milk,warmed
    1/4 cup flour
    1/4 cup butter
    1 1/2 cup cheese grated
    1/4 tsp creme of tartar (optional)
    FOR TUNA SOUFFLE', add 2 cans of drained tuna, 2 diced green onions

Butter the bottom and sides of a large, tall walled bowl. It should be deep enough to allow your souffle' to expand and rise to almost double its size.
Sometimes I coat this with a bit of fine seasoned bread crumbs or a mixture of bread crumbs and Parmesan cheese.  Set it aside.


Beat the egg yellows until they are smooth. They'll probably even get a little lighter in color and stream evenly when you raise the whisk out of the bowl.  Set these aside.
The egg whites will be handled a little later...for now just make sure there are no bits of egg yellow floating in them.
Egg whites are finicky...they won't whip up if there are any impurities hanging around, even if those impurities are other egg parts. Sheesh!

Anyway....
Prepare your roux by melting about 1/4 cup of butter in a deep pan, as it's melting add 1/4 cup of flour and whisk, whisk whisk or stir, stir, stir while this cooks.  The flour/butter mixture should thicken and turn light brown.  (If you're using whole wheat flour it'll get darker than with regular flour). Turn off the heat but keep pan on the burner.

Add a small amount of the roux to the milk and mix. Set the burner on low,then add this milk/roux mixture back to the remaining roux while stirring. Stir until fully blended.  The roux will thicken the milk, which is a good thing.  If you go no further, you have made a white sauce.  Gee!  But we're not done yet.

Tempering egg with a little roux
Reduce the heat. Add a bit of this roux stuff to the egg yellows while whisking. This is how you "temper" the eggs-that is, add them to a hot ingredient without partially cooking them first. Once you see that the eggs and roux have incorporated, add it all back to the remaining roux/milk mixture in the pan...continuing to whisk over a low flame.

Once this is all mixed together, you can add the cheese. Stir constantly while the cheese melts.  If you go no further, you'll have mastered a basic cheese sauce.  Yay! But we're still not done.  Turn off the flame and let this rest while you handle the egg whites.

This is a make or break situation.  Done right, your souffle will be light, airy, soft and moist.  Done wrong, you'll have a dry, hard, springy thing that may or may not be edible.  Maybe as a bread? Hmmmm.
Beating egg whites
Eggs softly peaked
Watch carefully as your egg whites develop.  Some people use cream of tartar to help with this process, but its not necessary.  Sometimes it even makes them too stiff, but what ever is your preference so be it.
Personally I don't use cream of tartar in souffle', preferring it in meringue.

Folding egg white into batter
Now comes the next important step....folding the egg whites into the batter.  Notice I said "fold" not "stir" or "mix" or even "incorporate."

Batter and prepared bowl
You want the egg whites to still be and act like egg whites, so the batter is going to look wrong.
Our Home Ec teacher gave us a hint that still rings true today...when it comes to souffle' the wronger it looks the righter it is!

Next, pour the batter into the prepared bowl and put it in the oven to cook for 30-35 minutes.
While that happens, and if you want, you can make a nice simple sauce utilizing some of the steps we worked on at the start of this recipe. Of course, you'd use a lot less flour!  White sauce, cheese sauce, you name it.  Although not necessary, such a thing would add an extra dimension of flavor to the dish

WHITE SAUCE FOR SOUFFLE'
 1 cup milk
3 Tablespoons flour
3 Tablespoons butter or margerine

Put butter in pan, add flour and whisk over heat until butter and flour thicken.
Add milk and continue to whisk while this mixture thickens more.  Season with salt and pepper to taste. You can add other seasonings too. Some folk even add a bit of nutmeg.


The finished product, Cheese Souffle' with White Sauce will be an unexpected surprise for end of month dining. You don't have to stick to just cheese, either.  Add some tuna, chicken, ham or beef...veggies like diced onion, artichoke hearts, shaved carrots, peas...the sky's the limit!


Thanks to my Home Economics teacher, I learned that cooking is more than a chore and that making a souffle' can be a lot of fun.

Experiment! Enjoy!

Souffle' with white sauce and salad

SHORT CUT!          SHORT CUT!         SHORT CUT!
 
Sometimes there just isn't time to make a conventional white sauces. That's why God made condensed cream of whatever soups! They come in lots of different flavors and sure cut down on the preparations!
Of course you'll still have to make the roux, no way around that. The roux contains the flour that helps to hold the whole thing together. 
I learned that the hard way in Home Ec class.


Tuesday, September 20, 2011

Culinary boredom...Chicken Adobo to the Rescue!

I wonder how chicken got such a bad rap?  Know what I mean?  Why is it that when somebody's afraid they're called "Chicken."  Why not something more suitable like, gee....like Turtle?  After all, don't turtles hide in their shells 'til the coast is clear?

They're so "chicken" they bring their hiding places with them!

I have yet to see a chicken do that!  Oh, I understand when you scare a clucker, they run away.  They sure can't fly worth a dang.

Maybe they're afraid to fly. Hmmmm.  A chicken being chicken. Hadn't thought about it quite like that before.

Chicken...again?!
Anyway....seems we eat a lot of chicken in this household.  And although there are a million different ways to cook it, sometimes when I see that packet of poultry sitting there, it's all I can do to keep from making peanut butter and jelly instead. 

Not that I'm ungrateful, it's just....well....

"You again....!" I heard myself say this morning when I set the stuff out to defrost.  "...Didn't we just have you the other day?"   What to do, what to do?   We've had it fried, stir fried, fricasseed and stewed, baked, broiled, boiled, grilled, stuffed and skewered....in soups, in salads and in sandwiches....and to me, in its most  ironic form...with eggs.

After that, what else is there?

Sure, I could start the rotation over again....fried is always nice. Grilling's nice, too.
But darn it all, I wanted something different.
Something ethnic....and not a burrito.  Been there, done that one too.

I was just about to start preparing for grilled "Chicken Whatever" when it hit me! Something we had years ago at a friends' house. Chicken Adobo.  Suddenly I was excited!  The kitchen shimmered with new light!  Even the skillet was smiling....and if you know anything about cast iron, you know how difficult that can be!

Vinegars and Soy Sauce
Chicken Adobo is a wonderful dish of Filipino origin.
It's one dish that shouldn't be left on the back shelf.
Did I still have the recipe?!?
Could I fake it?  Or was I too chicken to try?

"Well, that tares it!" I said to nobody in particular. "No brain of mine is gonna call me a coward and get away with it!"  And with that I pulled out my big recipe box and rifled through the many cards until at last it was found. An adaptation I came up with after that memorable evening meal. Chicken Adobo. Yay!

Scanning the ingredients I was pleased  to note we had everything here in the house. No last minute store runs!  Another Yay!  I could serve it with rice. Yay again!  Rice and a nice green salad.  Triple back flip off the high diving board Yay!

This household would not fall victim to culinary boredom....not on my watch!  At least not this night.

CHICKEN ADOBO

3 lbs. skinless, boneless chicken breast meat
1/2 lemon freshly cut
4 to 6 slices of lemon peel
1/4 cup vinegar (I used a combination of Balsamic and Apple Cider vinegars)
2 or 3 dried bay leaves
1 Tablespoon soy sauce
1 head of garlic, crushed
2  green onions, chopped 
OPTIONAL - 1/4 teaspoon ginger, chopped fine
1 Tablespoon butter or margarine 
4 quart sauce pan with lid
1 teaspoon black pepper
Water, apple juice or weak chicken broth (or combination of all three) to be added as and if needed
OPTIONAL - 1 or 2 small apples, sliced and one dab of butter

Wash the chicken thoroughly-you know where it's been! Pat it dry with a paper towel. Rub all over with lemon. Squeeze lemon juice over chicken and let sit while you get the other ingredients together.


Add vinegar, soy sauce, bay leaves, lemon peel and about 2 teaspoons of the garlic in the pan.
Stir this around over a medium heat for just a few moments, then turn off the heat.

Cut chicken into serving size pieces then put it in the pan.

Chicken added to liquid
Put the pan over medium-high heat. DO NOT STIR.  Do not stir until the vinegar/soy mixture begins to boil.  Once the vinegar/soy mixture starts to boil you should give everything a good stir to make sure the chicken has been coated evenly. Then set the cooking flame to low, cover the pan and let it simmer for about 30 minutes.

Check on it once in a while. Give it a stir, give it a sniff. It should smell tangy. There should be enough liquid so that the chicken is mostly submersed.  If it looks like you need some additional moisture, add some of the water/broth, stir everything then cover it again to resume cooking.

Garlic, green onion, apples, lemon peel
While this is going on, heat a large skillet and add the butter, apples and remaining garlic (ginger if you chose). Cook, stirring often, until the apples are browned and slightly softened, garlic is golden brown and soft. Then set it aside and  prepare the rice and salad.  

After 30 minutes, the chicken should be done.  Remove it from the liquid and add it to the apples, green onions and garlic.  Return the garlic pan to the flame.  Cook, stirring often, until the chicken and garlic join forces...about 3 to 5 minutes or until the chicken has browned, then add this mixture back to the liquid.
Adding it all together

Stir it around over a low to medium flame so that all the ingredients get acquainted, then lower the flame and let simmer about ten minutes, then that's it.


Chicken Adobo with Apples.  I know....it's not "authentic" with the apples, so make me stand in the corner.

Chicken Adobo and Rice
There you have it.  Give it a try!  Don't let anybody call you chicken!

Sunday, September 18, 2011

PRODUCT REVIEW - KITCHEN TOOLS - Tribute to An Ancient Mixer

I sing the praise of a wondrous thing....a hand mixer from a bygone age.  It comes with its own cabinet, suitable for hanging on a wall or keeping in a drawer....but who'd want to? 
May I introduce....drum roll please......
the Hamilton Beach Scovill model 110.  This hand mixer is a dependable work horse.
Hamilton Beach Scovill Model 110
It has remained alive and well used in my kitchen for many, many years....long after other, more recently manufactured mixers bit the dust. 

I'm not just talking those cheap Kitchen Gourmet versions they sell at the corner drug store either! I'm talking Black & Decker, Sunbeam...some name brands here.  And not only that, some of 'em were full sized table top numbers, like  the Sunbeam stand mixer. Couldn't stand up to the almost daily batches of cookies I had to make while working at the Co-Op.  
The day that fancy mixer died, good old 110 saved the day.

Model 110 in cabinet (closed)

Considering its size and more importantly, its age - there's a lot to be said for the old 110!  In its time, from the mid '60s  through the early '70s, it was probably considered downright groovy.  


We've had this beauty in our family since around 1992, when Jack and I were just beginning.  In fact he bought it for me at a yard sale. My old hand mixer was on the blink and he figured it would work until something better came along. I went right home and used it to mix some cookie dough.  It was pretty much love at first use, other than the power cord's propensity to fall out of its socket. Oh well.


Things I like about the HBS model 110
1) It still works  (duh)
2) The cabinet. I've tried hanging it on a wall and it works good that way, too.
3) It still works
4) The beater release is not complicated
5) The beaters are bigger and heavy duty

6) Feels well built, well balanced
7) Vintage appeal
8) It still works

Power cord problem
Things I don't like HBS model 110:
1) The power plug tends to fall out of the side mounting
2) Not enough power for certain mixing jobs
3) The power lever should stick out a little more
     Other than that, I have no real complaints.  I'd be panic stricken at this point if Old 110 suddenly bites the dust.   

When I use it, I imagine something like the Brady Bunch kitchen...Ann B. Davis as Alice at her station (Gawd, those orange walls!) using this mixer with some avocado colored Pyrex bowls. 

Ahhhhh....those innocent times....nice to look back on these days, eh?

Retro like the Brady Bunch
So here's to the Hamilton Beach Scovill hand mixer, old 110....long may you run!


Rating : 5 out of 5 Mixing Bowls, even with the cord problem. Considering it's age, it's still going strong!

Friday, September 16, 2011

Turkey Burger Tacos and Courage

Ingredients for Turkey Burger Tacos
"Courage...."
I thought while folding the freshly grilled tortilla across its concocted innards. "....even if it doesn't look right, it should be edible!" But I knew better.  Sure, it would pass in my home.  Home's where sometimes  presentation means somebody remembered the napkins.

But it wouldn't do, just wouldn't do if I had any hope of competing on shows like America's Master Chef.

I caught my reflection in the glass cabinet and shook my head.  "Courage?  That's the least of your problems!"

See, I'd done a crazy thing.  I sent in my email application for season three of America's Master Chef....did it without thinking twice. Did it without thinking once, even. Did it because the stupid waffles, waffles ferchrissteaks, came out perfectly.  Not one dud.  And with the ancient waffle iron, no less.  Waffles....and suddenly I wanna go cook before Chef Ramsay!  Sheeh!

My face looked back at me with grave determination.  "Cook like you mean it, study....learn,..... pray." Sounded like my Kitchen Spirit was at it again.  "Yes, Grasshopper..."

"Oy!"  With that, I returned to the present moment. 

Ground turkey meat
I was making an experimental dish for dinner....this involved two things one, the ingredients and the other....hungry humans.   Why I wanted to play mad scientist when we were having company was beyond me, but hey.   If it didn't work out, I could always resort to waffles.

Hmmmmm.....Courage.

What we had going on was an adaption of Turkey Burgers.....Turkey Taco Burgers.  Why not?  Blame it on the tortillas, of which we had an abundance.....and the ground turkey.  Ground turkey has never been a household favorite, but ground beef was $14.99 for three pounds. Ground turkey was $6.59.  Once I got over the sticker shock, the choice was a no-brainer.  Even though I'd be met with some resistance on the home front. 

See, Jack's a purist when it comes to burgers....he'll try to be enthusiastic about ground turkey, but very rarely finds it a good substitute for beef.   And as for ground chicken, Textured Vegetable Protein, or Soy....let's not even go there.  He'll eat it if offered by a host or hostess but at home....Nada.

I'm always trying to figure out how to make the ground turkey thing work.  I've succeeded with versions of meatloaf and chili, but wanted something different.  The vision was a turkey burger served on a tortilla, trying to incorporate the best of both worlds. And if it flopped, so be it.  The dinner guest was a last minute addition to the line-up anyway.  I wondered if he liked waffles.

NOTE:  Because ground turkey is so moist, it's best not to add any egg. It won't help the patties hold shape. It'll just make things more soggy.   Usually I use something like rolled oats or oat bran or another bran as kind of a binder....a replacement for bread crumbs.

Crushing the tortilla chips
This time I wanted to infuse the meat with a bit of "Mexico" from the word jump.  So I got some tortilla chips and crushed them with my trusty rolling pin.  Crushed 'em til they were crumbs.  Then to that I added a few spices; garlic powder, a dash of dried onion, a speck of cumin....then added it to the ground turkey.  To that I added some very, very, very finely chopped green bell pepper, a finely chopped green onion and a dash of chili powder.  Then I stirred the whole thing around until it was well blended.

I took this opportunity to chop some tomatoes, lettuce, avocado  and cheese to stuff the tacos.   I also took some of the tomatoes and put them in a skillet with onions, garlic, chili powder and a dash of cumin...this would qualify as a sauce...at least for this first experiment.

Turkey patties browned and ready
After making sure the cast iron skillet was hot I coated it with a very small bit of grape seed oil.   Then I shaped the ground turkey into patties and began cooking them.   Five minutes on side one seemed to bring the right shade of brown to them, so I flipped the over and did the same.  When they were done, I set them on wire cake racks to drip any excess grease.

Then I heated the tortillas over an open flame on the stove-which had been impeccably cleaned-and set them aside on a plate.  Then it was all about construction. 

I didn't want the "standard" taco fold,  I wanted the dish to be somehow reminiscent of a hamburger.  That meant something a person could pick up in their mitts and shove into their faces....like a burger-but with a lighter bread component.

Pan browned Origami
I put a tortilla in the middle of a plate, sprinkled a small dab of cheese in the middle then added a turkey patty.  So far, so good.   The cheese would act like a glue.  I'd need more "glue" on the fold side too. So I added some of the pan "sauce" and a bit of chopped avocado, then topped if off with the "glue," er, I mean the cheese.   Looked okay.   
I decided to put the finished product on a bed of lettuce and tomatoes rather than putting more stuff inside.

Then it was Origami time......I folded the sides over, then folded the ends in on themselves, creating two "tabs."  Finally I brought the two "tabs" together across the top of the thing and pressed down.  The tabs popped apart, but otherwise the thing held its shape. A quick minute or two on the heated cast iron skillet seemed to persuade the little buggers to stay put.   And it didn't look too bad, either.

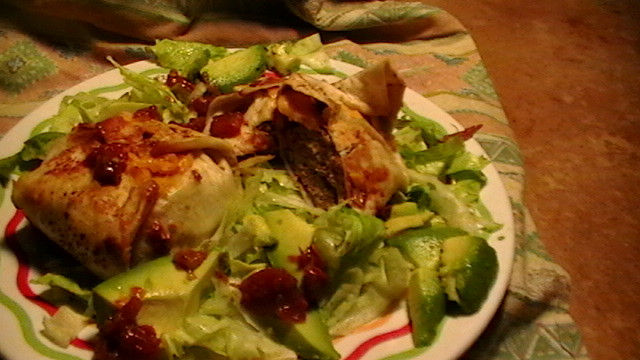
Turkey Burger Tacos 
Seeing that, I continued until all eight patties had been wrapped in their tortillas and finished with a moment on the heat.   Once the things were plated, they looked edible....even a bit interesting.  But would they be good?

Would they pass Jack's scrutiny?  Would our dinner guest like it, or long for waffles?

Turkey Burger Taco cut in half
I soon found out.   The meal was a qualified success.  Next time I'll serve a side of refried beans, and perhaps offer sour cream as a condiment....but other than that, there were no complaints.

While cleaning the kitchen after our meal, I saw my reflection in that glass door again and smiled.
"Courage..." I whispered, "courage and craziness.  Why not?"

Thursday, September 15, 2011

KITCHEN THOUGHTS - Cooking and "Me Time"

Busy, busy, busy day!  I woke up thinking there's be a few moments to myself then the phone calls started. Then the errands started piling up-you know the kind.....can't be put off, needing immediate attention and there's nobody else who knows how to do it just right.  So much for "me time!"

"Me time..."  I thought back to when there were hours, even days of the stuff. I have reams and reams of paper covered in poetry, prose, songs, artwork, ideas, blueprints.....cassette after cassette of songs and stream-of-consciousness compositions....even rolls and rolls of old film. all stored lovingly in three ring binders and boxes awaiting further attention.   

Present day "me time" happens in what feels like 15 minute chunks during the day, usually in the morning, and the night after every one else is asleep.  Luckily, I'm an insomniac so the night hours work for me. 


The kitchen...THE place for "me time"
Some chores qualify as "me time," cooking for example.  For me, creativity in the kitchen is a real sanity saver! It's a chance to let it all hang out....go a little crazy....ye-haw!

Sometimes it's quiet as church, sometimes rockin' with favorite tunes in the background...this  kitchen is at once meditation and dance hall, laboratory and artist studio. And if it means once in a while I'm found baking something at 3 a.m., so be it.   Don't worry, I'm fine....I'm in the kitchen and breakfast is bound to be something yummy!'

Tuesday, September 13, 2011

Yams To the Rescue!

"What's cookin'?" Jack asked as he came into the kitchen, "What ever it is, sure smells great!"

"An experiment..." I paused to look up at his face, "an experiment in pork chops."   My favorite guinea pig nodded and smiled.  His faith in me a restorative to my sagging spirits.  See, things had been going horribly wrong up to that point.

True, the pork chops, garlic, onions, apples and green peppers were filling the apartment with a wonderful fragrance....but the rice had already gone awry turning into a starchy ball of yuck before my eyes. Neither of us was in the mood for grits, again.  Noodles? Spuds?  Hmmmm. 

I was on the verge of giving up when he stopped by. 

I looked up from my handiwork, hoping I could live up to Jack's confidence in me.  "Well, the pork should be good at any rate. But I'm thinking of a  couple of alternates for side dishes.  Sorry. I know you wanted rice."

"Anything you do will be fine," he said, patting me on the head. "just no potatoes. Okay?"   Well, I thought, scratch that idea!  I looked around the kitchen.  What to do? What to do?
Add caption

My eyes fell apologetically on the basket of potatoes...
"Sorry guys," I quipped, "he's just not that into you."

But....there in that same basket lay the meal's salvation.  Yams!  Beautiful, flavorful, colorful Yams!  They would be a perfect compliment to the Pork Chops and Apples!

Suddenly my sinking heart was soaring skyward!  Those wonderful red gems, so often relegated to holiday side dishes or hidden in pies, these humble beauties would bring this meal home!  I grabbed a couple out of the basket, looked at the clock and commenced with the preparations.
There wasn't time for anything fancy, and at this point I wasn't in the mood.   There wasn't a lot of time, so what ever did would have to be, as we say in the computer geek world, "quick and dirty."

A simple thing, really....made even easier by the invention of the microwave.    
MICROWAVE?!!?  Yes.  Considering how long it would take to cook 'em via the more traditional route, the microwave was the only way to have everything finish at the same time. Sometimes a girl's gotta do what a girl's gotta do.

So after a good scrub, I scored each tuber with an "X" on two sides, set them on a paper towel in the microwave to cook on high for five minutes. After that, I flipped them so the underside was on top and let them cook for another five minutes on the same high setting.  The flipping is important.  It insures everything is done evenly, and keeps the texture from getting what I call "microwave weird."

While they were being zapped,  I finished the chops then got everything ready for service by putting some of the apples, onions, garlic and green peppers around them. Of course a few stray bits made their way on top of the chops too, Made for a better presentation. Then I buttered the yams, added some lettuce and tomato slices to the plate called Jack in for dinner.  Boy, was he happy!

From disaster to dinner in ten minutes flat!   Whew!
I'll be blogging the pork chop recipe soon, just wanted to get this yam thing out right away.
If you have any suggestions, ideas or comments feel free to submit them!

Sunday, September 11, 2011

September 11....Ten years after

Living isn't always pretty....sometimes it's downright ugly.

It's been ten years since commercial airplanes were turned into instruments of terror and death in New York, Pennsylvania and Washington D.C. Memorials about it are all over the news.....the film clips, the interviews, they're everywhere

I remember waking that morning earlier than usual for some reason...the t.v. was already on, Jack fell asleep to it the night before.  I had just put on my glasses and was getting out of bed when I saw the strangest thing.  Where I was expecting the morning news on our t.v., there was something that looked more like science fiction.


Two towers, one smoldering the other just standing there with a plane flying into it.  I couldn't believe it at first. Thought it was a movie.  But it wasn't.


I dressed quickly and got down to the Patients' Co-op, where I was volunteering at the time.  Others were already waiting to get inside.  Everybody was in shock.  Most were silent...their eyes glued to the large t.v. screen.

Around lunch time I took a walk with a friend to a nearby hill and looked at the San Francisco skyline.  "It could have been us, you know."  my friend said to me.  I had no reply.  We just sat there....looking at the world around us, knowing it would never be the same.

We all remember this day in our own way....some are attending prayer vigils, others are attending protests.  Me? I'm going to spend it here at home, with the people I love....grateful for what we have.

A million prayers for the thousands who lost their lives that day.....in the towers, at the Pentagon and in the field in Pennsylvania.  May their families and loved ones find comfort and peace.

Today's recipe is really simple.
Take humans of assorted varieties, add their surroundings  and stir carefully.  Add love in large amounts, continue stirring and adding more and more love.  It'll be done when we stop hating one another.

Friday, September 9, 2011

Coleslaw de tante

Is there any more sure-fire way to stimulate a conversation these days than to bring up politics?
You could be at a gathering of total strangers, and within three minutes of the topic's instigation you will be surrounded by every possible person....expounding every possible point of view. The only trick after that might be to extricate oneself before becoming embroiled in a heated, perhaps even physical tet-a-tet.

Republicans, Democrats, Independents, Greens, this party, that party....perhaps this is not the sort of discussion to be held so close to kitchen utensils....especially sharp knives.

We grew up in a somewhat "politically conscious" family; if by politically conscious you mean Republican.
We children were expected to tow the party line...from waving the flags at rallies as little kids to voting "the  ticket" when we came of age.  It was assumed.  And ours was not the only family like that. The neighborhood was crawling with them!

The Vietnam war...er, I mean conflict....er, I mean war....anyway, It tore through our town like a hellfire, drawing the Generation Gap battle lines straight through the family nucleus.  It destroyed parent-child trust, eradicated innocence and annihilated Ward and June Cleaver's brats status as role models to us kids.
The blinders were off.
 .
No family was spared, although some had it far worse than others.

Ours was an interesting scenario.  Naturally we had the heated discussions between Dad and his sons about long hair, the war and the draft....but there seemed to be a line in our clan that nobody would cross-a DMZ, who's location, depth and length were known to all parties involved.

That isn't to say things didn't come close....real close.  Def Con Five close.

While the "boys" were cutting their teeth on such things, we girls were expected to learn the ways of women....read "Stepford University."  Keeping house, raising children, walking, talking, acting, thinking, breathing and being "ladylike..."  this was supposed to be our fate; and we were expected to desire it as surely as a thirsty traveler craves water.

For some reason, even though Vietnam was knocking on our own front door via the evening news playing in the background during our dinner hour, we women were supposed to continue as we always had....stoically
clearing the table while the daily draft numbers were called.  And when the numbers came too close to home it was time to pull out the rosary, assume the position and let God do something about it.

It was a strange, emotionally charged time to be growing up....for all of us.  Parents and kids alike.  We were all learning from one another-whether or not anybody wanted to admit it.   Parents were learning what it was like to put their children's lives on the line...and the kids?  We were learning how to either "man up" or duck.

"Manning Up" meant either enlisting or going to prison, ducking meant going to Canada or getting some form of deferment.  The deferment usually involved some sort of school.  

But even on the tip of that Damocles's Sword known as the mid-and late '60s, there was that place of retreat our family seemed to find within itself - wounds, battle scars and all.  It had to do with traditions. 

Our family holidays became our DMZ.  The Thanksgivings, Christmases, 4th of July's, birthdays, weddings, christenings and funerals where everybody left their war-weary weapons at the door, sat down at the table and shared.  Once in a while somebody'd get a wild hair up their posterior...hey, shit happens.  But for the most part, our family always seemed to know how to get together. And they still do.

I know, we've all heard the horror stories of Thanksgiving food fights, shouting matches as a result of too much booze and too much baggage...dangerous combination, that.

Fortunately my personal memories of these times hold real beauty, warmth and love....even when the events of the 60s had us sometimes at each others' throats.  We seemed to know how to pull back from the brink, fix up the house and sit down to dinner.


Coleslaw with apples and raisins
One of the staples at these holiday meals was Coleslaw.  No holiday was complete without it.

To this day when I make this salad, my mind is drawn back to those days when everything was so intense....
 .....back also to the first times Mom let me try to shred the cabbage and carrots...without shredding too much of my fingers.    Watching the news today made me crave Coleslaw....a little corner of peace and tastiness in a world gone mad.

COLESLAW WITH APPLES AND RAISINS
Depending on how much you want to make, adjust your measurements.
I like to make a nice mid-sized bowl to have on hand in the fridge for a few days. The flavor enhances with time, kind of like Kim Chee.

1 large head of cabbage           6 carrots              
   (or 1 small head of green cabbage
   and 1 small head of red cabbage)
3 to 5 green onions chopped4 small red delicious (or other variety) apples - chopped     
1 to 3 teaspoons garlic powder (optional)
1 to 1 1/2  cups of raisins - chopped   
4 Tablespoons (more or less) sugar or sugar substitute
1 to 1 1/2 cup mayonnaise  
1/3 cup apple cider vinegar  
4 Tablespoons balsamic vinegar
dash of salt or low salt (optional)  dash of pepper (optional)

Start with a large bowl....

Rinse all fruits and veggies in COLD water.  Shred first cabbage(s), then follow up with carrots.  Chop green onions fine.  Add to the cabbage and carrots.  Mix thoroughly so that the flavors begin to pull.  Add chopped raisins and apples, mix again.  Set aside.

Add mayonnaise, vinegars and sugar together-stir with a wire whisk.  If you like it thicker add more mayo.
add spices, whisk again. Pour over the cabbage, carrots and so on.  Mix all of this together like you're tossing a salad.  I use two spoons.

Put this conglomeration into a covered bowl and refrigerate for an hour or two before serving.  Some people like it with paprika on top...I like mine a la natural.

OPTIONS:    
Waldorf Coleslaw - add chopped walnuts
 Hawaiian Coleslaw - add dried pineapple
 (fresh pineapple does WEIRD THINGS to certain foods...dried is the only option here)
Beer House Slaw - don't add sugar/sweetener, loose the raisins and apples,
 consider yellow onions instead of green, regular vinegar or balsamic instead of apple cider
 Broccoli Slaw - use grated broccoli instead of cabbage
 Kitchen Sink Slaw - close your eyes and start adding stuff.  Marshmallows might be a bit over the top, but what ever floats your boat.
Naked Slaw - nothing....absolutely nothing but the shredded cabbage, carrots and green onions.
 Clothing optional

 Enjoy!   Let me know what you think and if you have any recipes you want to share!
              

Monday, September 5, 2011

Pizza Jones and The Eggplant Alternative

Sometimes I get a craving for something a little cheesy with pepperoni, mushrooms, tomatoes and onions....something yummy.  Sounds like a Pizza Jones to me!

But with so many dietary considerations our the house, I'm trying to keep an eye on carbohydrates.  Eggplant is a great way to get most of the fun of good pizza without any of the starchy guilt. You can even cut it with a pizza cutter when the time comes!

Preheat oven to 375 degrees, assemble all ingredients and tools.

Scoring eggplant with a fork
Select firm, shiny, unblemished eggplants. These will become your pizza's base.  Once the veggies are washed clean, score the skin with a fork.

If you want to peel it, that's fine too. It's one of those personal preference things. Just be careful not to over cook it, skinless eggplant slices tend to get mushy quicker than their "clothed" counterparts.

NOTE: I don't bread my eggplant usually....it just tends to make everything too gummy and overcooked.  Besides, bread is what we're trying to avoid with this dish.

Next, slice the eggplant into disks and place these on  a wire rack for
Seasoning on the rack
seasoning. This step is important; it's where your pizza's "crust" starts developing flavor.


Think garlic, oregano, basil, dried onion...things you'd expect in a traditional pie. Be generous.   While doing that, heat and prepare your pan with either release spray or an even coating of oil. Then add the eggplant slices, spiced side down.  While they're cooking, season side two, then flip and cook them too. 

Cut the other ingredients in between spicing, flipping and so on.  You know the ones...tomatoes, mushrooms, green onions, pepperoni....what you usually like on your "regular" pizza pies.  In truth, I haven't tried pineapple with it yet, although Hawaiian is one of my favorite pizza types!

Don't let the eggplant slices get overcooked!  A little browning is all that's needed. Pay extra attention if you skinned the vegetable ahead of time...don't want it to turn to mush!

Prepare one or two cookie sheets by coating with an even film of olive oil or cooking spray.  Sometimes I sprinkle a little cornmeal on top of this, sometimes I don't  For this recipe I didn't but if you want to, so be it.
You'll find an extra texture and flavor to the underside of your "crust" when it's done.

Parm/Romano cheeses and green onions
Arrange eggplant slices to form a base for your other ingredients.  Then it's all a matter of layering.  Start with cheese, the "glue" for your pizza.  I sprinkle some grated Parmesan and Romano, then go in for the kill with a generous dose of Mozzarella.

After that comes the diced green onions.  I prefer these to the full grown onions because they have a more delicate flavor-they give a hint of their lineage without going overboard, and are tiny, delicate slivers rather than big, strong tasting strands. 

Next comes diced fresh tomatoes. 
Tomatoes diced
I don't bother with  canned tomatoes here, but if you must don't forget to strain them first. After that I usually do a little more spicing - garlic, oregano, a little crushed dried anise or fennel - and then back to layering.
Then I add an additional sprinkle of Parm/Romano...then more layering.

IMPORTANT: Try to distribute everything evenly, that way you'll be sure your flavors will be balanced.

Pepperoni and mushrooms
Next comes pepperoni, mushrooms and what ever else you might like....olives are nice, anchovies, green and or red bell peppers, sausage, spinach, diced garlic....kitchen sink.  Go ahead!  Have some fun!  Just remember to drain anything that comes with extra liquid, and in the case of the kitchen sink, make sure you have a professional installation-don't want any leaking going on!


At long last comes the final few additions....a nice sprinkling of Parm./Romano,a dash more garlic and oregano if you think it's needed, then a final bit of Mozzarella....just because.  


With a final flourish, put the assembled "pizzas" in the oven and bake for 15 to 20 minutes, or until everything is cooked and the cheese is melted.  There might be a slight browning to the top of any exposed eggplant edges. That's okay.

After it's done, take the pies out of the oven and let them rest for about five minutes while you call everyone to the table.  This pie will slice easily with your favorite pizza cutter.  Serve with soda, beer or other favorite beverage and any side-dishes you want.  But even if you just serve it solo, you can feel assured that you've eaten your veggies.

No guilt, no gluten Eggplant Pizza...Enjoy!


Eggplant Pizza....Enjoy!
 
As always, let me know what you think...if you have any variations or suggestions....any recipes you'd like to see on the site-along with your name as contributing cook.

Sunday, September 4, 2011

Labor Day Memories and Grilling Thoughts

Those grilling days of yesteryear
As a kid, Labor Day marked the end of summer. The final hurrah, the last chance to make any bragging points for the pending What I Did On Summer Vacation report all kids had to give when going back to school.  
The trick was to do something nobody else had done, or stand out in an admirable way-admirable to peers at any rate.

Our Labor Day Picnic sponsored by the local scout troop was a fairly good way to do both at once.  There a person could excel to greatness by simply winning a game or contest.  There were plenty of both to chose from....sack races, foot races, egg races...pie eating, hot dog eating and more.

Most of the time, the same kids seemed to win and why not?  They were bigger or smaller, faster or more coordinated,  or they could just plain eat everybody else under the table.  Simple genetics.   So, although I participated in the contests, I never expected to win and considered myself a well adjusted youngster for having come to that workable conclusion.

Oh, I still gave it my all....poised at the starting line, I looked the part of a true contestant.  But then, with head tucked down and shoulders rounded, I'd  launch forward at the whistle and fall flat on my face.

Call it my signature move. The first few times it happened, I became the subject of great ridicule.  That first week of school was hard enough without being pointed at, laughed at, whispered about and....the very worse thing possible-imitated.

But then as the years and Labor Day picnics came and went, I did my move so often, it wasn't even noteworthy anymore.  In a weird form of cosmic irony, the very thing that garnered me a moment's attention-albeit the wrong kind-wasn't worth gossiping about any more.   Oh, once in a while somebody new would come along, point at me and ask, "Isn't that the kid who....?"  But their pals would wave it off with a "Yeah, yeah...so what else is new?" Talk about embarrassing!  That really made me want to hide in the nearest locker, which unfortunately was two sizes too small.

I became indifferent to these Labor Day festivities....attendance was family mandatory, so there was no way to avoid the inevitable parental encouragement...."Go on now, get into the spirit of it."  UGH!

As fate would have it, I did finally actually win one of those !&#%!&@$!#! races....move and all!

Rather than dreading the picnic that year, I decided to just go with it....enjoy it 
Psych myself into a different space, so to speak.  And it seemed to work.

A sense of peace, of readiness and determination came over me.

But even more....it was like the universe was agreeing with me for once.

I felt it, from the moment we set up our picnic table.  We'd finally gotten the prime spot, under the tree....it had usually been taken by the time our family got to the park. This told me the day was very special indeed.
Sure, there were the same kids, same hot dogs, same park.


But there was something different in the air as I stepped to the starting line. There was a confidence, a sense of ....possibility.

The starting whistle sounded and the race began with, of course, my signature move.

But I was able to regain my composure before kissing dirt this time...and I ran.  It didn't matter to me if anyone was cheering or not. The only thing that mattered was the streamer up ahead, marking the finish line.

For some incredible reason, I knew before the race was even half over that victory would be mine.

I felt the streamer stretch across my chest and arms...and then, when maximum tension was achieved I felt that ribbon surrender with a snap to the inevitable force of my youthful determination.  I had won.

It wasn't until I turned around to shake hands with my opponent that I discovered there wasn't one.  Apparently the other runner tripped over a loose shoe lace a few feet back and was still recovering....a crumpled, teary-eyed heap left mangled in my dust.

I won a cheerleader's style baton and tried to learn twirling....and almost gave myself a concussion when the thing came crashing down on my head after a missed catch.

These days Labor Day is much less strenuous.  It's just us "old folks" here at home and we're inclined to stay around the house and eat something grilled while watching a movie or playing music. A kinder, gentler celebration, if you get my drift.

Grilling Thoughts
Jack likes grilled anything....I think most of us do.  There's just a special flavor you don't get from any other method of cooking. As to which item(s) to grill?  It could be anything, from beef to fish, fruit to veggies...anything is possible if you just remember a few things.

Grill only items that will stand up to grilling!  Mahi Mahi fish works great!  But perhaps that flounder fillet you've been thinking about would be better if it were broiled or pan seared.  

The difference?  Thickness and texture.  Flounder is a thinner fish....it's texture is less dense than Mahi Mahi.  I've seen some gallant efforts to grill flounder fillet....sad.  Very sad.

Try something out of the ordinary...Shish Kabobs.  Or a grilled corn on the cob side dish.  Or let 'em really think you've lost it-grill a pizza!

The sky's the limit, when it comes to food and flying....so why not?   Explore!  Invent!
Enjoy!
Happy Labor Day!

Friday, September 2, 2011

PRODUCT REVIEW - G-Rilla grill

Upon seeing this advertised on t.v., I thought the G-Rilla Grill might be what I need for indoor cooking.  I was a little hesitant; it was made with aluminum and I was worried about it warping.

But Jack said I should give it a try anyway...he was in the mood to buy me a present and the thing came as a two-for-one deal, so I figured why not?
G-Rilla Grill ribbed side after only 2 uses

We weren't doing any out door barbequing lately, and I missed that special flavor that only comes with that type of cooking. The closest we'd come lately was very high heat and my cast iron pan.  Fifteen years old, that thing.... and it's still working good as new.

Anyway, it took several weeks for my package to arrive.  When it did, I was a little concerned.  The box was light.  I'd expected a bit more...even with aluminum, I expected that with two grills there'd be a bit more substance to the box.  Upon opening it, I saw why.

The grills were okay dimensionally....they easily covered two burners each, like they should.  But they were light, really light, even for aluminum.

Side one was a ribbed grill with an offset diamond center...I supposed this was to help channel heat.
Side two was a flat surface grill, but it wasn't exactly flat.  There were little raised circles placed 'round the edges like they were part of the mold and didn't get quite sanded down.  I couldn't think of any other reason for them. Both sides came equipped with two corner reservoirs for catching grease.

Okay, so much for inspection, it was time to cook.
Simple burgers....a bit of ground beef, low-salt, diced onions, formed into patties.  I chopped some onions into rounds to help season the grill.

I got the grill hot-being sure to bring it slowly up to temperature with both burners at the same heat level.
Although there was a non-stick surface claim, I wasn't taking any chances so lubricated it with a bit of canola oil release spray.

Then I added the onion rounds to brown them and add some base flavor to the grill.  I noticed that the onions were trying to stick....hmmm.  Flame not high enough?  Too high?  Nothing was burning. Hmmmm.

After removing the onions, partially browned, from the grill I let the thing come back up to temp.  That's when I noticed it, the grill was warping.  Right in front of my eyes!

I double-checked the flame...medium.  Hmmmm.
I knew aluminum had a problem with too much heat, but was sure I followed the printed instructions, such as they were.
Warping problem

It was time to put on the burgers.
Okay, so they cooked, after a fashion.  The meat stuck in between the ribs, the grill kept warping.

The burgers were burnt in some places, scorched is more the appropriate word, and I swear the heat was no where near high, matter of fact I lowered it to low-normal just to see if it would stop warping.
Not-so non-stick
Grease spattered all over the stove top. I was surprised no one had thought to add tall sides to the thing. Poor planning.

Clean up was difficult, the "non-stick" surface seemed to come off with the food.  Using the recommended warm, soapy water and rag wasn't enough.
Warping

It took a lot of elbow grease to get all the specks of burnt on burger off the grill....And looking it over while drying it, I noticed the warping was even worse than originally thought.

I tried cooking with the ribbed side one more time and had the same experience.  Food sticking and scorching, warping, grease spattering everywhere and difficult clean-up. Too bad.


The flat side seemed to work a little bit better, although being warped made the grill rock too-and-fro.  The non-stick surface seemed more stable on this side, although I noticed by the second use there was some evidence of surface damage.
Flat side a little better

Mind you, I used the proper utensils, monitored the heat and did everything else according to directions but the G-Rilla Grill couldn't stand up to the test.

I don't rely on it for regular grilling....at least not the ribbed side.  Once in a while I'll use it for flapjacks or browning eggplant slices, but not for any heavy grilling.   It's just not a good thing.

Product Review Scale:  One mixing bowl- because even the worst things have some redeeming quality. In the case of the G-Rilla Grill, that quality might easily be that I've not seen it advertized on t.v. since shortly after ordering it.


Submit Express SEO Services

Free Web Submission

Powered By Blogger