Monday, August 1, 2011

Components - not just for stereo anymore

Hooking up modern electronics isn't pretty.  Nope.  Right up there with sausage making, high school science class dissections and cleaning behind the dryer.  Nope.  Not pretty at all.  But it has to be done.

In our house I am fortunate....both of us are equally willing to go through the torture of re-routing wires, programming the t.v. and figuring out the remote control. But I know of some households where there is only one Techie for the entire domicile. You can tell which one from a mile away.  They are the ones who look frazzled a lot of the time from  doing battle with the alleged plug-and-play equipment.

You might wonder where I'm going with all this.  Well, that's easy.
We're going to talk about something I call a "component" salad.  That is, a salad with many parts and features.
I know....I can hear it now.  "Okay, so you wanna make a salad.  Don't all of them have 'many parts'?"
Component salad components

Well....yes....and no.

To me, a "component salad" contains three main elements.  The cool, crunchy leaves on the bottom, a warm, veggie and protein bit in the middle and a topper of tomatoes, other cool veggies, croutons and dressing.

 It's a great way to use up leftovers like chicken and mushrooms, which is what I did this time out.  I heated them, with a little extra garlic and some carrot shavings for good measure, while cutting up the other ingredients-Romain lettuce, green onion, tomatoes and so on.
Component salad assembled
Go crazy.  It's a salad fer cryin' out loud!   Chill these things in the fridge for a few minutes.  We want the contrast to stand out.

Assembly is easy too.  Start with the chilled lettuce, then the warm things then finally the toppers.  You can make what ever dressing you want, served in a cruet on the side or drizzled over the toppers.

This salad is one of those you either love or hate....there doesn't seem to be a middle ground.  Some people like the idea of contrast, others don't.   But you won't know until you try. So give it a shot and let me know what you think.

Wednesday, July 20, 2011

METHOD - The Sound of One Hand Egg Cracking

Egg legerdemain
If you've ever watched a cooking show or a chef guest spot on a talk or news you've seen it.  That trick of cracking eggs with one hand.
Have you tried it yet?  Well I have.  And after several miserable attempts I actually got the hang of it!

Then after a while I did it so often it became commonplace. I had to raise the bar. I had to keep it fresh so proceeded to teach myself how one hand crack an egg in each hand. Then how to do both at the same time.  That was during a time when there wasn't really a lot else going on for me, so I learned origami and honed some cooking skills. 

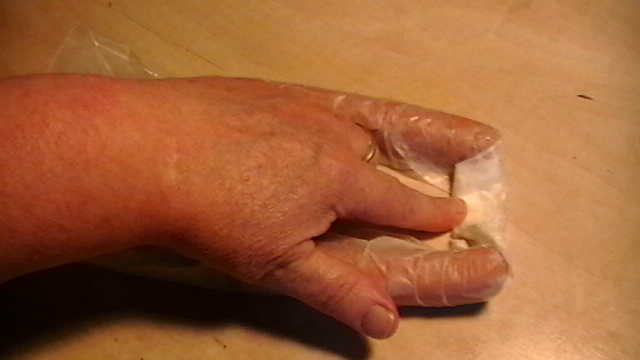
There are some tricks to it, at least my version of doing it at any rate. You need a fair amount of dexterity in your fingers, especially the two middle ones....you know, the ones Spock uses in his special greeting.  I'll try to explain, and let the pictures tell the tale as well.

But first a bit of a disclaimer.  I don't claim that my method is the "professional" or right way. Nor do I claim you'll never get egg shells in your eggs.  To the contrary!  Most likely for the first several attempts you'll have 'em all over your fingers, in the bowl and where ever else they want to go. Fear not!  This too shall pass.

While you're practicing, make sure you're not just wasting eggs....plan on making something with them, and the sooner the better!  Eggs can go bad quicker when they're no longer in their shells.

Okay....here goes. 
Lightly tap the egg against the bowl
Grasp your egg firmly between your thumb and forefinger.  Tap the egg lightly against the edge of the bowl.  You just want to crack the egg, not have its contents spill out prematurely.

Position egg over center of bowl
Next, lift the egg away from the side of the bowl so it is positioned over the middle of the bowl.  If you look at this next picture you can see how I'm pulling the egg apart primarily  with my ring finger, index (or bad) finger, pointer and thumb.

Guiding egg to split apart
Here's a much  closer shot of the process, showing the little finger and ring finger pulling the egg shell in one direction while the unseen index and pointing finger pull it in the other.  The thumb and palm act as holders. You want to maintain a steady grip. Just be careful!  Don't go using a death grip! Squeeze too hard and you'll end up with egg all over the place.

Egg coming out of shell

In this photo (using my right hand) you can see how I'm pulling the egg shell apart and allowing the innards to spill out.  Yes, my hand gets sticky.  The egg kind of slides past my two middle fingers sometimes, that's hard to avoid.  No matter.  Once you've gotten to this stage, you've done it!  Congratulations!The index and little fingers are doing their part, too; guiding their part of the shell to make the opening wider.

The birth of the egg....or is it re-birth?
Don't worry if you don't get the hang of it right away.  You will with a little practice, then you'll be wowing them in the aisles!  Or at least in the kitchen.  Good luck!

Wednesday, July 13, 2011

KITCHEN TOOLS - The Rolling Pin

Here's to the rolling pin...that handy dandy tool that is at once dough roller, crumb maker, meat tenderizer, veggie smasher, talking stick and equalizer all in one.  The power one can wield with this device in hand is not to be ignored!  With it, a person can make biscuit dough cooperate, reduce hard cereals and so on to crumbs and so much more.

Let's get rolling!
I'd imagine it was one of the first real "kitchen" tools...although my version of its discovery may be slightly different from the actual facts.

Picture if you will, a cave.  The cave man of the house has just come home with breakfast...a rabbit, or it's equivalent. The cave woman of the house sees the hare and grumbles "Hasenpfeffer again!"

In anguish she takes a thick tree limb she's been playing with and smashes it against a pile of seeds. She notices the seeds crack open.  This is her Eureka moment.  She smashes the seeds to a fine paste, and after skinning the rabbit, rubs the meat with some of the seeds before setting it on a stick over the fire.

Mr. Neanderthal is happy with the results, so is the Missus.   She decides to try her magic stick on other things.  Gradually grain seeds are smashed to a powder, water is added....the stick is used to flatten out this mush into something.....and suddenly she's making breads and cookies.

And when hubby tries to steal one of the cookies still cooling on a rock, she smites his hand with that same utensil. And there you have it....the basis for not only the rolling pin as a kitchen tool, but the start of that life-long vision of woman "training"  man with a rolling pin.

Modern day rolling pins can be made of anything, from hollow plastic that you fill with ice water, through the various wood designs (with and without handles) and even pins made with copper, glass and marble, just to name a few.  The marble, metal and ice water filled varieties can be especially handy for working with finicky pastry dough.

According to Wikipedia, they come in different models:
  • Rod: Thin rods typically made of wood around 2–3 cm in diameter. They are used by rolling the rod across the dough using one's palm. The pins may be tapered at one or both ends for more pivot control in certain tasks such as making small jiaozi skins or pie shells. Most East Asian or French style rolling pins, and the Turkish Oklava are rod style.
  • Roller: Consists of a thick heavy roller made of a variety of materials around 7–10 cm in diameter with thinner handles which extend through the roller. They are used by grasping the handles and pushing the pin across the dough. Many Western rolling pins are roller types.
  • Textured: Some specialized rolling pins have textured surfaces that mark and indents the dough surfaces for special breads and pancakes.
The wooden ones are great for pastry, too....although I put mine in the freezer for a few moments to chill it before working with some doughs. 

It's a versatile tool no kitchen should be without! 

Sunday, July 10, 2011

PRODUCT REVIEW - KITCHEN TOOLS - Ball Tipped Whisks

 Whisk, whisk whisk!   How many eggs, sauces and other things have you whipped into shape through the years?  My first such experience was as a child at home in the kitchen with my mother.

We didn't have any of those fancy-schmancy wire doo-dads like on the cooking shows.  Nope!   We used a plain old table fork, or occasionally one of those hand-cranked egg beaters.  Of course for the really big jobs we just used a mixer.
Standard wire whisk
 My first experience with an actual wire whisk happened in tenth grade Home Economics class. I was immediately taken with how that tool made quick work of fluffing eggs, smoothing sauces and such.  

The construction and concept were so simple, elegant.  I couldn't wait to get one of my own, to try it out at home.

It took a while but I finally got one....in a gift basket of kitchen gadgets at my wedding shower.
I was thrilled.

Although the marriage didn't last, we were both so very young, my fascination for cooking and kitchen gadgets has remained strong.  So when I saw this latest version of the whisk, I had to get one and try it out. 
Ball tipped whisk set

What we're looking at is a set of ball tipped whisks. There are three different lengths to accommodate any task.   These particular ones were ordered online and they arrived were not a disappointment.

 
Generous handle, balanced feel
 Unlike some other kitchen products I've ordered via the
internet, these felt well built and didn't get all bent out of shape after one use.  The cook in me was pleased about that.  The arthritic in me appreciated the generous handles and balanced feel of each tool.

 They work well on most things...taking on thick sauces with ease.  But I must confess that the old fashioned wire whisk still wins, hands down, in the whisking egg yolks division.  For some reason the ball tipped variety doesn't work as well in that area, leaving thready, transparent bits of egg white and membrane unincorporated in the mixing bowl.

Lumpy sauce needing help
But it did wonders on a stubborn  cheese and cream sauce!  What began as a hopeless, lumpy mess was soon tamed....turned smooth and lumpless under this tool's will.

Lumps?  Gon

Don't overlook the other possible uses for these things - icing drizzling was the first thing that came to my mind.  I have a friend who went to cooking school and they had to take a regular wire whisk and lop the bowed ends off to make an icing drizzler.

No need for cosmetic surgery with the ball tipped whisk!

I'll bet you could come up with several new uses too!  Feel free to send them and they'll be put up in the blog!

Rating Scale for this kitchen tool :

Five bowls!  I love them!


Monday, July 4, 2011

July 4th.....What would the founders think of our holiday fare?

When I was a youngster the 4th of July was something truly special; from the bunting along the parade route to the bar-b-ques and fireworks, it was a holiday to be reckoned with as far as festivities were concerned.

We really had picnics and potato sack races, hot dog eating contests, egg races (running across the field with a raw egg on a teaspoon a la Rata Nui....well, maybe not so dramatic as all that) and so on....the air thick with charcoal and burgers.  Soda pop tasted different then, so did lots of other things back when even cereal was "shot with sugar through and through."

I wonder what our founders would have thought of our diets...well maybe not even the whole cuisine Americana, just a meal in the life....like July 4th.    I wonder what they might have thought.

Hot dogs might have been more familiar than we think; sausage having been a form of meat preservation for a long time and in a lot of cultures.  Although our franks resemble more of the German than Italian variety, which would actually be more to the liking of say, George Washington.  He, Ben Franklin and the others would probably have enjoyed themselves thoroughly; no doubt taking the time to knock back a few beers with the local chaps.  Would they appreciate our modern brew, or find it wanting....too cold....too "light."
 ,
And then there's every modern cooking apparatus. Between the gas grills, microwave ovens, refrigeration and thermos containers they'd be totally amazed.....let alone the fact that we have electricity, cars, phones and so much else.  We might overhear whispers of witchcraft from the peanut gallery!

The world has come a long way since our Founders took that courageous stand for freedom back in 1776....
but in a lot of ways we're still very much the same underneath all the modern trappings.

One of my favorite things about picnics, July 4th or otherwise, is Potato Salad.  /

SIMPLY POTATO SALAD

There are as many ways to make it as there are stars in the sky; but they all have one very important ingredient-properly cooked, not mushy but not too hard potatoes.
After that it's all mixing and marination.

Potato Salad
To boil, steam or bake?  Well, steaming and baking retain more flavor....but again this is all a preference issue.   If boiling, start with cold water....cut 'taters into bite sized cubes.....peeling is also an option.  Lots of times I don't.. Bring water to a medium boil for10 to 15 minutes, or until a toothpick goes into the potato with little resistance.  Drain, run under cold water, drain again then chill for an hour in the fridge.

While that's taking place prepare your other ingredients.  As a child, I couldn't stand green bell peppers in potato salad. Mom had a terrible time trying to convince me of the culinary merit but I'd hear none of it.  These days I'm more open-minded but still consider it just one of many variations.

Diced onion, celery, hard boiled eggs....some folks even add bacon or olives....and there are several varieties of those to work with! German Potato Salad is warm and has a sweet, tangy vinegar nature to it.

White or American Potato Salad comes to us via mayonnaise....it comes to the plate cool, creamy and inviting.  Mayo is great, and can be added with a little sour cream or yogurt for an interesting turn of flavor- again, just an option.

Spices are important...important enough to be added with great care.  They shouldn't over power any of the other ingredients; rather they should be humble, complementary and well rounded.  Celery flakes (dried celery leaves) are fine if answered by something like a hint of garlic....salt and pepper to taste (dietary concerns to be considered), a dash of sweet paprika-not too heavy handed on this one!

Some will argue that pickle relish should be added....personally I don't, but that's just my own taste.

Pretty much just go with what you think tastes good together and don't forget to toss lightly rather than mix...let it rest periodically then when it's done cover it and put it in the fridge 'til it's time for service (or transporting to the cooler for the picnic!)

There are so many varieties of this dish, it's hard to pick a favorite.  Just remember to not over-cook the spuds, chill them before making them into salad and toss them lightly and you'll be fine.

If you'd like to share your recipes or other comments feel free. For now, happy 4th of July!

.


Friday, July 1, 2011

PRODUCT REVIEW - Suzanne Somers' Skillets

Suzanne Somers' skillets
Lots of celebrities have gotten into the Home Shopping Network biz, touting products that carry their names to the American public.

Diane had an aunt who kept the t.v. station tuned in just about 'round the clock for fear she'd miss t he conversations, descriptions and calls from buyers...of course there's always the possibility that she'd miss seeing something else she really didn't need to purchase.

Suzanne Somers
Of course, Aunt Ester had her own reason. She said it kept her company. Hey...whatever floats your boat!

I don't watch a lot of those things for the simple reason that I have not "extra" around, so wouldn't want to be tempted to covet something I can't afford.   Also, I've always got something going on....watching t.v. isn't foremost on my agenda. However I am grateful that these networks and programs are in existence...otherwise I'd have never inherited some really great cooking tools and gadgets. That's how the Suzanne Somers' skillets came to me...and I am sooooo grateful. 

Suzanne may have played a "dummy" on Three's Company, but she's no dummy in real life.  She's been championing healthy living, exercise and cooking for a number of years and, from what I've been able to experience, offers products with a high standard of quality.

Stainless steel clad copper plate for even heating
The skillets are solidly constructed and well balanced with reliable; each has covered handles and a stainless clad copper plate on the bottom that acts as a heat-spreader. I think they are referred to as Omelet pans online.  After several atrocities passing themselves as skillets came and went through my kitchen, it was quite a hallelujah moment when those two pans crossed my threshold!


Secure handles
The pans are a pleasure to work with and easy to clean.  No matter what I've cooked in them, they come back gleaming.  The even heating prevents scorching..  The handles don't feel like they're going to fall off. The pan feels like it'll last a long, long time.

On a scale of one to five mixing bowls, I rate these at five....meaning the BEST!

Way to go, Ms. Somers!


If you have any suggestions, comments or ideas feel free to submit them!
Enjoy!

Saturday, June 25, 2011

KITCHEN TOOLS - Waxed Paper

Waxing poetic in the kitchen
Pardon me if I wax poetic,
though my rhyme might be pathetic...
but if I may I'd like to sing
the praises of a simple thing-
a boon to many a cooking caper....
known throughout as plain waxed paper.

That's a wrap!

It most certainly is!  But seriously folks, waxed paper....which has been around for quite some time, is still as handy as ever. Even more so since the microwave became part of our kitchen's persona!

The invention of wax paper is often credited to Thomas Edison, although according to Wikipedia there are others who could possibly make that claim.  Before 1927, wax paper was sold in pre-cut sheets. Nicholas Marcalus then came up with the idea of putting wax paper on a roll in a box with a built-in cutter.


Waxed paper has been used since its inception to wrap everything from sandwiches to paintbrushes. With such versatility, is there anything this miracle product can't do?


Well, yes.

Wax paper should not be used to wrap or cover dishes in the oven. It'll smoke and catch fire. However, it can be used to line the bottom of baking pans and such, so long as the batter completely covers the paper liner.

Do not line a cookie sheet with the stuff, either.  Unlike parchment, waxed paper will go up in smoke if ANY of it is exposed directly to the oven's heat.  Believe me, your smoke alarm will thank you for taking this advice.

Waxed paper is not recyclable.  Period.  No ifs ands or buts about it.

But its uses far outweigh its limitations.


In the microwave, wax paper can be used to prevent splatters.  Because the paper is mostly unaffected by microwaves, it will not heat to the point of combustion under normal usage. This makes wax paper more functional than plastic wrap which will melt at higher temperatures, or aluminium foil which is not safe for most microwave ovens.

It can also be used in actual microwave cooking....much like one might use aluminum foil in a conventional oven.  Have you tried nuking a hotdog only to have it turn into a hardened stick?  Try the following trick and your franks will be, frankly, moist and yummy.

Hot Dogs a la Waxed Paper
1) Cut a fair sized piece of waxed paper and lay it flat on your counter top or table. Place two hot dogs on it spaced about an inch or so apart. (I've spaced these a little further apart for visual purposes)
  
Roll-folding the franks


 2) Fold the paper over the franks; tuck the paper in under each...make sure to leave space between them.  In a sense you will have "rolled" two tubes, one around each dog.  There will be extra bits of waxed paper on each end.  These are very important, as will be seen in the next step.

 
Fold ends in toward hot dogs
3) Take one of the paper ends and roll it in toward the hot dogs....fold it flat,
then do the same to the opposite side.


4) Tuck the ends in toward the middle, creating a sealed end.
Creating sealed end.

The end game


Do the same to the other side. Make sure you press firmly to insure everything stays put during cooking....the microwave has a tendency to make waxed paper try to open or unfold.


Waxed paper hot dog cooker
5) Your results should look something like this picture.  You'll probably have a little less space between the hotdogs, again I kept them spaced further apart for visual purposes.

Then it's just a matter of putting the packet into the microwave, cook on high for 30 seconds the flip it and cook for an additional 30 seconds
If you like your franks well done, you can cook each side a bit longer.
But keep an eye on them!  These puppies have been known to pop, even explode if left to cook for too long!

When it comes to waxed paper, this humble example is just the tip of the iceberg. The best way to find out what works is to use it.

Let me know your discoveries!

Monday, June 20, 2011

VEGGIE REVIEW-Eggsustaintial Eggplant

They are he eggplants, who is the Walrus?
Meet my friends, the "regular" eggplants.

Unlike its Asian counterpart, this version is wide and squat and less sweet tasting...but don't take that as a negative.  What some people see as this veggie's lacks in social graces, is made up for in usefulness and versatility!

Like the Asians, these can be stir fried, coated, browned, baked, stuffed, dehydrated (with a little seasoning) and used in so many ways!  The flavor is very similar their skinnier cousins, although maybe not as sweet.

This gem's color is a deep, dark, almost-black purple, and is always wide and somewhat squat.

If you've never tried working with one, an eggplant can seem a bit intimidating.  But it really isn't.
A little imagination, a little patience and you can master it's many culinary possibilities!

Truth is, it's all in the preparation.  If you pay attention to a few key points, you'll have a dish worthy of being brought to your table.

Key Points:
     *Eggplant should be fresh.  If it looks dull, pocked, is excessively bruised or scratched it will taste sour. When looking for an eggplant, act like you're looking for an ornament to hang on your holiday tree.  You want a nice, smooth, shiny outer surface.
     *Check the "crown" of leaves around the top.  If they are black and feel a little slimy, the thing's been overexposed to water or chilled too much.  It might mean the inside is bad, too. The leaves can be dark, but they should still feel firm like leaves rather than like soggy rags.
     *Use the eggplant as soon as you can after bringing it home from the market. Freshness is very important. Old eggplant just plain tastes old, and no amount of seasoning will change that.
     *Avoid making the thing too wet if at all possible.  Some people slice the eggplant and put it in a sieve with a weight to remove the extra moisture before cooking with it. I've tried this a few times early in my eggplant cooking, but for the most part found it to be an unnecessary step.  In truth it seemed to promote moisture rather than stop it.
     *When cooking with eggplant, remember it will soak up moisture better than any sponge. This holds true for oil and grease as well.  To avoid this problem, before bringing eggplant to the pan for browning, either spray the pan with a release spray or evenly coat the pan with oil (Extra Virgin Olive Oil or other) using a napkin to make sure the entire cooking surface is coated.
        Heat the pan with a medium flame before adding the eggplant.  Keep an eye on it!  Don't let it burn.

Scoring eggplant skin with fork
Some folks like to skin the eggplant before doing anything else, and that's understandable....the skin can be difficult to cut and perhaps even difficult for some to digest. Personally, I like to keep the skin on, but score it with a fork to make it easier to manage.

As far as recipe possibilities go, you'd be amazed..
Eggplant Parmesan, Spicy Eggplant Stir Fry, Grilled Eggplant and Eggplant Au Gratin are just a few to think about.

This purple beauty can be used as a substitute for bread, for meat and for pasta....and works great as an addition to stews, soups and casseroles. The only limit to it's potential is one's own imagination.

So if you haven't tried it yet, go ahead! See what all the fuss is about!


Sunday, June 5, 2011

PRODUCT REVIEW- The Slap Chop

Slap Chop
The Sham-WOW guy started hawking another product about a year or so ago...and since it was a kitchen gadget he got my immediate attention.  This tool, he claimed, would make chopping things so much easier, and unlike other similar units the Slap Chop would be safe, easy to operate and easy to clean.

I didn't run right out and get one.  See, I'm one of those weirdos who enjoy cutting their veggies and nuts the old fashioned way....with a knife.  Go figure.

But Jack spotted a display of "As Seen On T.V."  items near the check out line at Fry's Electronics and decided to buy me a present. 

As luck would have it, I was in the midst of a baking binge so had been chopping, cutting, clipping and cracking my way through nuts, spices and the like. If it worked, the Slap Chop had the potential to cut the job time in half, pardon the pun.

Once home, I unwrapped my new tool and read the instructions.  It looked simple enough; a spring action chopping blade, a plastic extender for using on a cutting board and a black plastic bottom cup for more contained work. And unlike similar products the Slap Chop claimed to be easy to clean, due to its unique "butterfly" casing design. This feature, more than the others, was important to me. 

I'd had a similar product years ago in my arsenal of gizmos and suffered a severe injury trying to clean it.  Needless to say, the thing ended up in the garbage, wrapped in the towel I used to stem the bleeding.
According to the Sham WOW guy, the Slap Chop people had solved that problem, and I was interested....albeit a little nervous....in checking the facts.

Looking it over, I kept thinking....this thing feels cheaply made.  The spring felt firm, but the rest of it felt  light weight. The blade itself seemed flimsy, the case was light weight plastic....real light weight.  I wondered if it might be too light weight for the job it was supposed to do.

This feeling continued as I washed the components in warm water in preparation for first use.  But I pressed on, wanting to put the thing to the test on some nuts that had to be chopped for cookies.  

Following the instructions, I first tried the tool with the chopping cup.  It seemed to do the job, after a fashion.
The problem was, nuts kept getting stuck in the blade.  And not just plain stuck, I mean stuck real bad.  I had to use a knife to get those nuts loose.

After the third attempt, I noticed the blade was getting bent.

Nut stuck, blade bent....during maiden voyage.
Undeterred, I next tried the tool with the clear plastic ring for use on a cutting board.  The same thing happened and the chopper got jammed. All this within the first 15 minutes of the maiden voyage.

Needless to say, I set the thing aside and finished the chore with my favorite knives, breezing through the pile of nuts with ease and no injuries. 

At clean up time, I tried cleaning the Slap Chop according to the directions.  After cutting my finger,  I stopped.  Hey, I'm a musician, my fingers are important and I need all of them!  No hunk of plastic will ever be worth me changing my name to Lefty!

To make a long story short, the Slap Chop did not live up to its advertising.  Personally I think it's dangerous and shouldn't be sold in its present state.  Perhaps the spring could be sold separately for use in factories somewhere, but as a kitchen tool, I find the Slap Chop to be cheaply made and unsafe.   I wouldn't recommend it to my worse enemy. 

I believe that every Slap Chop should be recalled, burnt beyond recognition and their ashes sewn with salt before being consigned to the bottom of a very deep pit in a very remote location. 

Of course that's just my opinion.

On a scale from one to five mixing bowls, one being yuck...five being yum, I don't think this product deserves even a shard of a mixing bowl. Mixing Bowl Scale - Zero.  Zip. Zilch.

This is one of the few times where I find no redeeming qualities whatsoever in a kitchen gadget.  
Sad.  Very sad. 

If you have tried the Slap Chop, please feel free to share your experiences...positive or negative.  Hey!  I'd love to hear that the thing works right for somebody!

Wednesday, June 1, 2011

What's With Wednesday? Chicken In The Middle Of The Week

Chicken used to be a Sunday kind of thing....there'd be a huge roaster in the oven, started right after coming home from church and breakfast was cleared. The bird was so big, almost like a little turkey.
Sometimes the hen was stuffed, sometimes not-but always roasted with a bunch of potatoes, carrots and onions. I remember those days clearly!
The chicken even tasted different back then; it was fresh.  It had a slightly sweet flavor...even a bit buttery if the hen was younger.

These days, between hormones and other forced-growing methods, caging, beaking and other horrendous practices, our very own chicken seems to have become a shadow of its former self.  Relegated to fast food menus, frozen, breaded patties and ground meat one would hardly recognize the venerable centerpiece that once only graced the Sabbath table.

We are fortunate however, that there are still a few poultry companies out there that have a conscience.  The result of this is a chicken that tastes right, smells right, cooks right and is one that you'd be glad to offer as a main course dish, whole or cut up.

Mind you, I've not seen many the size Mom used to get for our family meal-those things were BIG! But none the less, the quality is there.  When I shop I look for two things....healthiness and affordability. They are first and foremost in my mind as I view my list and trawl the aisles.

Safeway's Natural Brand
Safeway offers "Open Nature" brand poultry....meaning it's not been fed with anything nasty like hormones and antibiotics....given whole grains and so on.  It's a bit more pricey than the other varieties, and I'll confess that I can't always get "Open Nature," but I have tried it and it tasted really good...almost brought a tear to my eye.

But my wallet has the deciding vote. Mostly I'm left with Foster Farms...and when even that is priced too high, I get the lesser grade store brand. Fine quality, don't get me wrong. But you do get what you pay for. I've often been able to get the higher quality via the Mark-Down Bin, so that's a good place to start for poultry shopping excursions.

Be careful though!  Bring the meat over to your shopping cart and look at the color there-away from the special pink lights.  Smell the package. Feel the package.  If you can smell it, or the package feels sticky make sure it isn't opened somewhere.  If it is, don't - repeat DON'T buy it!  Return it if you can to the meat counter attendant.  Wash your hands soon as you can!

With so much of it available and so many different ways to cook it, Chicken doesn't have to be for Sunday anymore. So what's with Wednesday?  Why not chicken?


LEMONY CHICKEN IN THE MIDDLE OF THE WEEK

2 or more lemons
2 TBS Dijon mustard
4 cloves garlic, minced
2 tsp fresh parsley chopped fine
2 tsp extra virgin olive oil
2 tsp dried rosemary

black pepper
1/2 tsp salt
Garlic powder for extra flavoring
1 whole chicken about 3-4lbs
1 1/4  lbs small red potatoes cut in half

Preheat oven to 350
Squeeze lemons, set squeezed lemon halves aside for later use.
Combine parsley, garlic, rosemary, lemon juice, oil, pepper, salt, mustard and garlic in a bowl and blend well.
Set aside 2 TBS of this mixture for later use.

Put the chicken on a rack in a roasting pan-hint-use release spray or oil on rack and on pan for non-stick and easier clean-up! Gently slide your fingers between the meat and skin all around the bird, including breast, thighs and so on...careful not to tear the skin.  Spoon the remaining (larger amount not the 2 TBS reserved) between the skin and the meat all the way around.  Give it a rub while you're at it.
Sprinkle the outside with Garlic powder if you want to.
Place the lemon halves in the cavity.  Put in the oven and bake for 30 minutes.

Meanwhile, toss the potatoes with the remaining lemon/parsley juice.
Slice additional lemon(s) into disks. Set aside 'til the last 10  minutes of cooking.
Arrange around the chicken and put back in the oven to bake for an hour, or until juices run clear.
During the last 10 minutes, add the lemon disks to the top of the chicken and put it back for the reminder of the baking time.
The internal temperature of the chicken should be 180 degrees.
Remove from the oven and let stand for 10 minutes before cutting.

Serve with rice, sweet green peas and a nice salad.

Lemony and light...Chicken on Wednesday. Why not?

Submit Express SEO Services

Free Web Submission

Powered By Blogger